okay, here goes!
well, first the basics.
Bear with me, as I tend to go off on a tangent sometimes to explain stuff
also, I decided to not use too many caps. I guess you'll have to live with it. heh.
read through the whole walkthrough, and post any questions you may have before you take
your car apart!
the parts you have to accumulate:
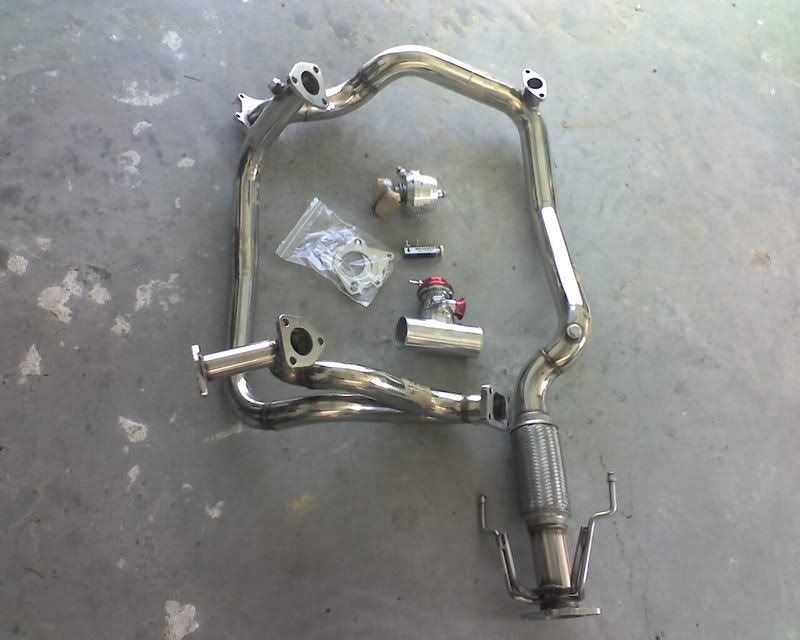
1. ebay hot pipes(ford probe GT v6 kit) - they fit. I promise you.
2. second gen DSM bov and the pipe it bolts too.
3. if using k8 - get the 220cc injectors(more on the install later)
4. if using the klde or ze - get the 280cc millenia S injectors.
5. when installing the injectors, get a long reach 90 degree needle nose pliers
6. also get new seals for the injectors.
7. whe nyou purchase your injectors, check them when they are not installed with an ohm
meter(multimeter) and make sure that they are good. 220cc injectors read about 15ohms
+ or - 2ohms. any higher or lower and they are probably no good/junk. check the online
manual at mx-3.com for which wires to check.
8. you can use the 280cc injectors in the k8, but you will have really bad gas mileage I
hear.
9. when installing said injectors, make sure the plastic stands don't fall into the engine.
hold them in place with thick grease, or silicone, and when installing the rails, get
the stands into place with the long reach injectors.
10. be gentle with the harness going into the rails, they can be brittle.
11. also, REALLY watch the knock sensor wire. it is always dry and cracked, and if you are
not careful it will wreck it. maybe it would be a good idea to change it when you are
there? I don't know, but mine got wrecked when I installed the injectors, and it still
seems to run okay, but the cel(check engine light) is on now.
12. okay, the injectors part is done.
13. now back to getting parts....
14. you will need a aem uego(best for the price) wideband A/F gauge and sender/electronic
bit
15. also, get a boost gauge. one that reads vacuum and boost up to 25psi at least.
16. 10-15 feet of vacuum line and assorted T fittings and stuff like that. size depends on
what the nipple is on the back of the boost gauge, and bov, etc
17. wastegate. 38mm. some people have luck with the cheaper tial knock offs, but it is
better to go with the turbosmart one. it is cheaper than the tial types, but just a good.
make sure you get the 7psi spring too, because you can always turn it up with a boost
controller later.
18. next get a FMU. vortech 12:1 (I know, it isn't a very good fix for raising fuel
pressure under boost, and it can't be tuned much, but it will get you going until you can
get the Megasquirt and spark setup which is far better)
19. while your at it, get the 2 pod gauge pillar thing.
20. don't forget to buy gauges that are 2 1/16 because most popular pillar gauge pods
things come in that size.
21. when installing the FMU, run the line from the stock fuel pressure regulator to the
inlet on the fmu, and on the outlet, plug the hose that you pulled off the FPR into it.
22. I guess I will go into turbo selection now. well, that part is a science that you will
have to learn. I went with a t3/t4 hybrid. it seems to work well, but it has quite a bit of
lag. but that just means that I can drive around with no boost, and get good gas mileage.
but when I really mash the gas pedal, boost gets going quite nice!
23. when running the oil lines, there is a sender on the front of the engine on the
passenger side that has the oil panic light sender in it. just remove it(a pain) and
install a fitting and a Tee and run your oil line from there, and reinstall the sender.
24. on the fitting on the turbo end, get a restrictor for it. about 0.060"ish. any bigger,
and you may burst your seals so to speak.
25. for the oil drain line, get a oil safe hose at least 1/2" in inner diameter, and run it
from the bottom of the turbo into your oil pan...
26. oil pan bung... get a nipple fitting that fits inside the 1/2" line, and then remove
the oil pan, and get the fitting welded at a high point in the pan, away from any retateing
parts(rods, crank throws, etc)
27. hose clamp the drain line onto the oil pan when you get it all in place. since there is
no pressure here, hose clamps will be fine.
28. the oil pan is not too hard to remove with the engine in the car.
29. a quick note about turbo selection... internal wastegates won't fit. I tried, I built
an adapter so attach the internal wastegate the the down pipe, but it hit on the clutch
fork, and burnt my disty cap because it was too close.
30. also, another quick note about the ebay pipe flanges. the up pipe is a standard t3
rectangle flange, and the downpipe is the standard 5 bolt down pipe flange. that makes it
easy to find a compatible turbo.
31. here is the part that I am still working on, the fuel pump part.
32. I got a fuel pump from a turbo laser(DSM) flows 190lph which is plenty for lower boost
amounts(less than 8-9psi) it will be a bit os a hassle to get it installed, as you have to
fab up some wires and such, but that will be another faq later. atleast it is cheap! there
is lots of those around. I got mine for 30 dollars.
33. you could go with a walbro 190 or 255lph, but that is more expensive, and we are on a
budget here! but it would work though, for the record obviously
34. you will probably have to buy a t3 up-pipe flange gasket because it may not come in the
kit(mine didn't) but that is available from many parts stores.
35. did I mention a better clutch yet? well here goes. I bought a exedy clutch for my
atx-mtx swap, and it slips under boost. doouu. get at least the act one, or the unorthodox
one. good for at least 200 ft/tq or more.
36. now for the fun part. the actual install.
37. lets get the hard part out of the way first. the exhaust manifolds.
38. first go under the car and remove BOTH dust sheilds(much easier that way)
39. get a big breaker bar and remove the three bolts holding the stock downpipe to each
manifold. these almost always break, but that doesn't matter, because we aren't using any
of it anyway.
40. then just saw(sawsall) off the rear part just ahead of the catalytic converter(these
bolts never come off easy).
41. when that is out of the way, remove the front exhaust manifold cover(three 10mm wrench
bolts I think) and remove the manifold itself. most of the bolts are a pain in the butt to
remove, but it isn't impossible, just be patient.
42. next, the hardest part of the install. the rear exhaust manifold cover. grr. the only
way to do(easiest) it is to remove the passenger side vris stuff, and get some of the bolts
from the top, and some from the bottom. same goes for the actual manifold bolts too.the
cover bolts usually break, but that is okay, you know, we aren't using them anyway.
43. when the front manifold is off, it is time to follow step 23. it is easiest now because
the manifold is out of the way.
44. then install the back and front headers and gaskets. this part is pretty
straightforward and easy.
45. now it's time for the up pipe install. it goes in pretty easy, but you may have to
install 1(one) bolt at a time on each header to line up everything.
46. then it's turbo time. install the t3 flange gasket that you purchased in step 34. and
the turbo, and then snake up the downpipe from the bottom and attach it.
47. this is a good time to run those oil lines.
48. shoot, did I mention that you have to remove both crossmembers from the bottom of the
car? well do that before you do any header/manifold work.
*edit: I would have moved step 48 into the right place, but I didn't want to go through all
the step referrals all over again
49. when you install your downpipe, just wire the remaining exhaust out of the way for
later muffler shop reconnection. you could do it yourself, but it may end up looking
butchered. and most local muffler shops will make it look pro, and only charge you about
$50-$60.
50. you will have to buy a cone style filter that fits over the turbo inlet. this depends
on which turbo you buy, so you will have to look around. just clamp it on the turbo inlet.
60. install the external wastegate now on the port on the up pipe. this is easy, just
follow the instructions that come with the wastegate, and in about 5-10 mins it will be
installed.
61. your turbo should have a vacuum/boost nipple on the outlet. put a short piece of vacuum
line on it, and then a four port Tee and run one spot to the wastegate, and one to your
BOV(more on the BOV later) and one into the car to the boost gauge. there is a place near
the master cylinder behind the battery(USDM cars) that has a rubber plug in it. you can use
this place to run wires/hose, etc into the car.
62. run a vacuum line from the intake somewhere into the FMU if you are using one.
63. now onto the wideband bung. the slow expensive way is to get the bung welded on at a
shop(maybe get them to do it when you get the muffler work done). I just put the wideband
o2 sensor in the rear o2 sensor spot. It seems to work for the initial get go. I know, this
is a hack way of doing it, but the computer doesn't seem to mind at all for some reason. It
may make your car not pass emmision inspection though.
64. run the wires through the hole outlined in step 61.
65. if you did it right, you will have your wideband and boost gauges installed in the
pillar pods all wired and plumbed in now.
66. this part is tricky. you will have to get some silicone adapters to attach your
throttle body and the outlet on the turbo. this will be different in all cars. just fight
your way through it.
67. my method didn't include installing a intercooler, so I just plumbed the turbo outlet
into the bov, and the bov into the VAF, and the vaf into the throttle body.
68. don't overtighten the clamps on the vaf. it is fragile!
69. I just vented my BOV and wastegate to atmosphere. that is the quickest and coolest
sounding way to do it.
70. unless I missed something, you should be able to start the car now, and check to make
sure that nothing is touching/scorching against the new pipes that are crowding the engine
bay now.
some side notes(there will be lots of these in the time to come I am sure)
for some reason when you first start boosting, there is a strange sweet smell that comes in
the car. it isn't like coolant sweet, I think that it is the coating on the headers or
something burning off at high EGT's
also, watch your A/F gauge. under cruise it should be about 14.7? but under boost it
shouldn't go over 12.5:1 otherwise it will burn your engine down in no time flat!
try not to do any part throttle boosting also because the computer really runs lean in
these times, and the fmu won't be able to keep up(only if you have a fmu, and not the MSnS
or course)
be prepared to waste lots of gas in the first couple days/weeks! because it is the most fun
thing in the world to drive a car that has been turbo'd. baring the obvious of course.
I know I missed some stuff, but at least this will get you over some of the hurdles that I
had to jump over. I will be adding to it for a while too, so if anything is strange,
doesn't make sense, or needs to be clarified more, just post, and I will add/fix/modify as
needed
7
ps. it is a goal of mine to get a post in the faq section.