KLZE swap DIY
KLZE swap DIY
ok, so I have checked mechanic shops all over my area and I continually get the same answer. "We don't swap different sizes of engines. Its to complicated or time consuming" So I am thinking about doing it myself. The only problem is that I have no tools or equipment and very little experience. Do you guys think I could do this? What tools and equipment would I need? I doubt it but if there is anyone that live in Idaho that could give me a hand I would greatly appreciate it. How long does a swap usually take?
-
lakersfan1
- Senior Member
- Posts: 3825
- Joined: June 26th, 2003, 2:01 am
- Location: Puyallup, WA
-
bmwm3guy

- Regular Member
- Posts: 1066
- Joined: March 7th, 2004, 2:01 am
- Location: Gatineau, QC
- Contact:
Re: KLZE swap DIY
start by searching, this site is a goldmine of info. I did my first ZE swap at 18 years old with no prior auto experience. Took us about a week of casual work. Id say we spent about 48 hours doing it and we took our time.luke_mx3 wrote:ok, so I have checked mechanic shops all over my area and I continually get the same answer. "We don't swap different sizes of engines. Its to complicated or time consuming" So I am thinking about doing it myself. The only problem is that I have no tools or equipment and very little experience. Do you guys think I could do this? What tools and equipment would I need? I doubt it but if there is anyone that live in Idaho that could give me a hand I would greatly appreciate it. How long does a swap usually take?
Second one I did by myself (with occaisional extra hands for those tricky situations) and it took about 30 hours. Its really not hard at all.
-
hppwdn

- Regular Member
- Posts: 925
- Joined: May 27th, 2005, 10:50 pm
- Location: West Palm Beach, FL
- Contact:
As long as you can round up a millenia IM it should be pretty simple. The straightneck ZE requires a bit of extra work to install.
We did the swap in two days when I got mine. We worked for abour 6 hours one night and about 12 the next day (ended up cutting off the hub nut after 1 breaker bar and 2 craftsmen 1/2" ratchets). We've done about 5 ZE swaps in probes though. Shooting for start to finish in one day next weekend.
The outer dimensions of the engines are the same. If you tell them to use your K8 manifold a mechanic should have no complaints doing the swap. Make sure they reuse the exhaust manifolds too. They are slightly different. Then when you get it home you can swap on the millenia IM. I'd recommend either a Probe/MX6 ECU or putting in a Megasquirt. It'll make the car run a lot better.
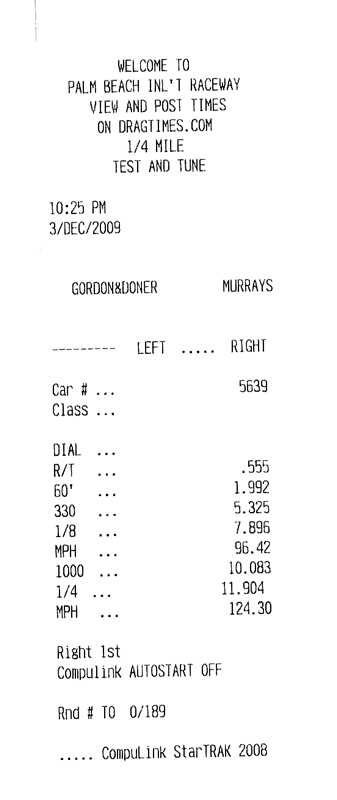
92 MX3 Turbo ($100 junkyard KLG4) 11.904 @ 124.3mph, 14psi, DOT approved Hoosier drags, pump gas.
NSCRA 2009 FWD Drag Radial Finalist
HIN/NOPI Supershow Class Winner - Miami 2010 - Street-Sport Compact-Mazda
Links: Pretty Pic, GoFast Pic, Timeslip, Track Video
As of July 2011 the MX3 has been retired and sold.
NSCRA 2009 FWD Drag Radial Finalist
HIN/NOPI Supershow Class Winner - Miami 2010 - Street-Sport Compact-Mazda
Links: Pretty Pic, GoFast Pic, Timeslip, Track Video
As of July 2011 the MX3 has been retired and sold.
I'm new to this forum, but have pulled and installed motors in quite a few different cars. Here's some basic thoughts.
-if you don't have it, buy it. Especially common hand tools, sockets, wrenches, ect. Craftsmans a good idea cause if you break it you get another one NO MATTER WHAT. Even people like me that shatter ratchets in hand fulls when doing major work... Even after the swap you will no doubt need to do work on the car and almost everything you buy will come in handy later. Thats a given.
-You will need a lift "and crap" Unless your a tricky little monkey and take it out thru the bottom. ~Get engine ready for removal, remove center member/cross member, vehicle should be on stands, crate dolley under car, wheels off, strong jack, remove stands, rest engine on dolley, unbolt completely, jack car back up, wheels back on... wheel engine out.
Keep in mind the car has to go WAY up in most cases to clear the engine... I've done it twice. If the car slides back you'll dump it on its rotors... or worse, the engine sitting on the dolley. I've found renting a standard hoist is VERY inexpensive. Find a tool rental center near you... Mine was only $40 for 2 days. Other tools you need as a "one time" thing will also be available here. Rental shops are your friend... so be nice.
If your HE-MAN you could lift it out. But let me tell you, I carried an iron block 4G63 (Mitsu 2.0L) without the head by myself ONCE. Its not healthy.
-Round up the parts WAY beforehand. This will give you time to pick them over and atleast visually check them. It will also give you time to familiarize yourself with whats going to go where, what it does, and what it plugs into, before your reaching in the car blind trying to find where that one last plug goes. Labeling is KEY. Even "know it all's" label. Masking tape and a pen costs $1-$2. Will save you hours.
-Read, the path you have chosen is undoubtedly been done before. So by reading the swap threads you will see the common problems encountered and have a "BETTER" chance at getting "MOST" of it right. You-Will-Not-Get-It-All-Right. Never. Whether its a stuck bolt, a silly sensor or a kinked wire, there will always be something. Expect it. How big of a set back will depend on your skills, and the quality of the engine, parts your working with. The more resourceful you are the more time AND money you will have left over for fun stuff.
-Common sense-
The only thing that you cant buy. I can't help you here. Take your time, do it right the first time... then you only have to do it ONE time. Don't force it. And oddly enough don't be afraid. I learned everything I know from doing. Yes, I've s--- canned a few parts, or had to do things again... but initially you gotta learn. Just don't be afraid, its just an engine. This is where reading will help. The better you understand what you're dealing with the less anxiety you will feel when it starts to go wrong. Good luck.
-if you don't have it, buy it. Especially common hand tools, sockets, wrenches, ect. Craftsmans a good idea cause if you break it you get another one NO MATTER WHAT. Even people like me that shatter ratchets in hand fulls when doing major work...
-You will need a lift "and crap" Unless your a tricky little monkey and take it out thru the bottom. ~Get engine ready for removal, remove center member/cross member, vehicle should be on stands, crate dolley under car, wheels off, strong jack, remove stands, rest engine on dolley, unbolt completely, jack car back up, wheels back on... wheel engine out.
Keep in mind the car has to go WAY up in most cases to clear the engine... I've done it twice. If the car slides back you'll dump it on its rotors... or worse, the engine sitting on the dolley. I've found renting a standard hoist is VERY inexpensive. Find a tool rental center near you... Mine was only $40 for 2 days. Other tools you need as a "one time" thing will also be available here. Rental shops are your friend... so be nice.
If your HE-MAN you could lift it out. But let me tell you, I carried an iron block 4G63 (Mitsu 2.0L) without the head by myself ONCE. Its not healthy.
-Round up the parts WAY beforehand. This will give you time to pick them over and atleast visually check them. It will also give you time to familiarize yourself with whats going to go where, what it does, and what it plugs into, before your reaching in the car blind trying to find where that one last plug goes. Labeling is KEY. Even "know it all's" label. Masking tape and a pen costs $1-$2. Will save you hours.
-Read, the path you have chosen is undoubtedly been done before. So by reading the swap threads you will see the common problems encountered and have a "BETTER" chance at getting "MOST" of it right. You-Will-Not-Get-It-All-Right. Never. Whether its a stuck bolt, a silly sensor or a kinked wire, there will always be something. Expect it. How big of a set back will depend on your skills, and the quality of the engine, parts your working with. The more resourceful you are the more time AND money you will have left over for fun stuff.
-Common sense-
The only thing that you cant buy. I can't help you here. Take your time, do it right the first time... then you only have to do it ONE time. Don't force it. And oddly enough don't be afraid. I learned everything I know from doing. Yes, I've s--- canned a few parts, or had to do things again... but initially you gotta learn. Just don't be afraid, its just an engine. This is where reading will help. The better you understand what you're dealing with the less anxiety you will feel when it starts to go wrong. Good luck.
Mitsubishi, Mazda... what next?
-
PATDIESEL

- Senior Member
- Posts: 4476
- Joined: August 13th, 2001, 2:01 am
- antispam: ~SPAM*SUX~
- Location: Atlanta, GA.
I've got a whole write up on the process and tools required. I need to break it up a bit to make it less tiresome to read and add pictures, but you can get a good idea of what you are getting into.
http://www.atlantamx3.com/mocaforum
http://www.atlantamx3.com/mocaforum

ZE -strait neck,headers,2.5 exhaust,pheno spacers,lower cross member,GC coils,MS struts,Brembo slotted rotors,filled MS mounts,SS brake/clutch lines, CAI,to rear bat reloc,Hella headlamps,Hella DE fogs 180WHP
-
Rick Johnson
- Regular Member
- Posts: 677
- Joined: July 24th, 2002, 2:01 am
- Location: Calgary
-
lakersfan1
- Senior Member
- Posts: 3825
- Joined: June 26th, 2003, 2:01 am
- Location: Puyallup, WA
Most of the tools you'll need are pretty common. Socket set with 1/4, 3/8, and 1/2 drive wrenches. Sockets ranging from 32mm to 10mm. Hammer, pry bar, screwdrivers.
As for the engine lift, if you live in a decent sized city, just find "rental - tools" in the phone book and start calling. There should be a few places that will rent you a lift by the day. The lift I got was about $30 a day I think, and it broke down small enough that it fit in my hatch.
As for the engine lift, if you live in a decent sized city, just find "rental - tools" in the phone book and start calling. There should be a few places that will rent you a lift by the day. The lift I got was about $30 a day I think, and it broke down small enough that it fit in my hatch.
-
Tunes67

- Supporting Member
- Posts: 4708
- Joined: January 27th, 2005, 6:36 pm
- Location: Everett, WA
- Contact:
Depending on how long you need the lift.. might just be worth it to buy one.. check out http://www.harborfreight.com They also have other useful tools like floorjacks, jackstands, engine stands, cherrypickers.. etc..
Tunes67
Tunes67
"So long.. and thanks for all the fish!" "Momma says VW Bugs are the devil" "This one time at band camp.. I stuck a flute in my Throttle Body"
"Screw you guys.. I am goin home"
I am the Cranky God of Mods!!! Tremble before my fury!! LOL
"Screw you guys.. I am goin home"
I am the Cranky God of Mods!!! Tremble before my fury!! LOL
-
Gro Harlem
- Senior Member
- Posts: 3391
- Joined: November 30th, 2001, 2:01 am
- Location: Stuttgart, Deutschland
- Contact:
there is a lot of writeups already about what tools and stuff you need.
it is as easy a swap as replacing your K8 with another K8, there is no additional steps involved whatsoever, everything plugs up.
you can rent a hoist for 25-35 a day or buy em for around 160 new from harborfreight. you also will need 10,12,14,17 and a 32mm socket for the axle nut.
air tools for the axle nut are almost a must...the nuts never want to come off without jackhammering them for awhile
Noble Green Metallic 93' GS Hybrid, 91' 1.8 323
DONATE TO MX-3.COM
DONATE TO MX-3.COM
Break the lugnuts on the front tires loose
Remove hood (optional, just makes life easier if you do)
Wedge something on the backside of one of the rear tires
Jack the car up
Pull the front wheels off
Drain fluids
Disconnect radiator hoses from the engine (one on driverside, one on passenger side)
Disconnect fan electrical connectors
Remove radiator support and remove radiator (once again, optional but it removes the possibility that you will damage the radiator)
Remove brake booster line (tube that runs from the brake master cylinder to the intake manifold)
Disconnect all electrical connectors
--VAF:air meter in your intake tubing
-- Fuel rails: two clips
--IAC: little white clip on the throttle body
-- Distributer: two clips
--Coolant area: Look near the cap where you fill with coolant. There will be four clips
------green clip-coolant sensor
------ black clip-coolant sensor
------ small black clip- temperature sending unit
------ gray clip- knock sensor
--Oil pressure sending unit-small clip by your oil filter
--TPS: clip on throttle body
--EGR:two clips towards the rear of the engine
--Starter: one nut and one small clip on starter
--Alternator: one nut and one clip
--AC compressor: one small clip (if you have ac)
--VRIS: one white clip, one blue clip on the top/rear of the intake manifold
--PRC: (solenoid hooked via vacuum lines to the fuel pressure regulator)
--Grounds: Larger ones(passengerside motor mount, near starter
Smaller ones (just look around, they are the wires that look like they don't really do anything)
--o2 sensors: one on front exhaust pipe, one on rear
I think that's all. Just going for memory, so if you see more, just unclip them!
Remove all intake tubing
Disconnect fuel lines
Remove clutch slave cylinder (two 14mm bolts)
Disconnect throttle cable from your throttle body, remove from throttle cable bracket.
Disconnect the two smaller coolant lines on the driver's side of the engine
Disconnect both lines going to the power steering pump (one requires pliars for a small spring clip, and one requires a 17 or 14 mm socket)
Remove axle nuts on both sides (big socket, can't remember size, possibly -23mm?)
Unbolt passenger axle support (3 bolts on the rear of the engine, just follow the axle and you will find it)
Pull axles out. The passenger side may want to fight you. If so, just pull it out as much as you can, and as you eventually life the engine it will come right out
Unbolt AC compresser and move to the side
At this point, if you haven't rented a hoist, you may want to
Remove the cross-member that runs from the drivers side to passenger side (four large bolts -17mm if I remember correctly)
Disconnect shifter support and shifter linkage (I think the support requires a -14 mm, linkage requires a -12mm)
Drop the exhaust piping (deep well -14mm -3 bolts on front, 3 on rear)
Unbolt front and rear motor mounts from the cross-member that goes from front to rear (-14mm) --You can remove the mounts all together if you want--
Unbolt that very same cross-member from the car (-17mm bolts, two on the front, two on the rear)
Hook up the engine to the hoist. Do not lift, just apply slight tension
Remove both side motor mounts
Unbolt both side motor mounts
Driverside- (4) -14 mm bolts, a few -17 mm bolts you may need a deep well for
Passengerside-(1) -17mm long bolt, (3) -17mm -one is to secure a ground, you may have already removed this since you already disconnected your grouns)
Pull it out.
Remove tranny from engine
Remove clutch pressure place
Remove flywheel
--FYI-- When you re-install clutch and flywheel onto the ze, you MUST torque these bolts, also make sure you stagger the bolts as you tighten them!!!
If you are swapping the straight neck for a curved neck, make sure you swap manifolds while the engine is out of the car.
Install...reverse of removal
Ever have any questions, shoot me a PM
This is all off of memory, some bolt sizes and what not could be incorrect. Feel free to add some feedback since there is a good chance I may have forgotten something.
