So Doing the HEI Mod, I drilled into the cap where I assumed the metal from the center contact on the cap went to the spark tower. The drill slid off the metal but I was pretty sure the screw for the MSD power tower was making contact with the metal in there. I figured I'd try and test it figuring there should be continuity from that central contact to the tip of the new power tower. There wasn't. I thought something was wrong but then I tested continuity from that center contact to the tip of the old spark tower and there's no continuity there either. Is there a gap in there somewhere that the spark is supposed to jump, between the OE coil to where the rotor contact is? Thats the only thing that makes sense to me since I'm pretty sure I didnt break any kind of connection in the cap. Couldnt find good info describing the cap modification, just Gro Harlems pics showing where he put the power tower.
thanks in advance,
Rik
HEI distributor cap modification
Re: HEI distributor cap modification
ok, so I guess the Distributor cap doesnt work the way I thought it did, I had forgotten I had a spare cap in my collection of parts, I tested continuity on that and its the same thing. So apparently current from the coil must jump a gap in there somewhere, before jumping another gap to go from the rotor to each cylinder. I dont get why.
Re: HEI distributor cap modification
Here's a pic of a disty cap modded (about half way down the page). http://www.clubprotege.com/wil/howto/hei/index.htm Is this where you drilled?
2004 Subaru WRX Silver, stage 2, minty interior.
2002 Subaru WRX Blue, SOLD (best E test numbers I've ever seen)
94 MX-6. Sold
92 GS KLZE 5 Speed
96 GS 5 speed, KLZE, Sold
95 GS Minty Shape Sold
92 GS Sold
92 GS Parts Car scrapped.
Feedback viewtopic.php?f=37&t=66348" onclick="window.open(this.href);return false;
7477th member.
I know you believe that you understand what you think I said but I'm sure you realize that what you heard is not what I meant.
-
Nd4SpdSe

- Senior Member
- Posts: 11213
- Joined: May 25th, 2002, 2:01 am
- Location: Québec City, Quebec, Canada
- Contact:
Re: HEI distributor cap modification
HEI mod is replacing the actual igniter inside the disty
What you're doing is the external coil with the disty tap. Indeed you still need to do an HEI mod with the External Coil, but you're modding the cap for a coil, not the HEI, it doesn't require cap modifications
What you're doing is the external coil with the disty tap. Indeed you still need to do an HEI mod with the External Coil, but you're modding the cap for a coil, not the HEI, it doesn't require cap modifications
1992 Mazda Mx-3 GSR - 2.5L KLZE : Award Winning Show Car & Race Car ['02-'09] (Retired)
2004 Mazda RX-8 GT - Renesis Wankel : LS3 Coils, BHR Mid-Pipe + Falken RT-615K 245/40r18
2011 Mazda Mazda2 GS - 1.5L Manual : Yozora Edition (1 of 500)
2003 Nissan Xterra SE - 4x4 Supercharged : 2" Body Lift, 4" Suspension Lift & 33" MTR Kevlar
2001 Nissan Frontier SE - The Frontrailer : Expedition/Off-Road Trailer Project
-
cWs306

- Regular Member
- Posts: 622
- Joined: May 3rd, 2010, 2:09 am
- antispam: ~SPAM*SUX~
- Location: Saskatoon, Saskatchewan
Re: HEI distributor cap modification
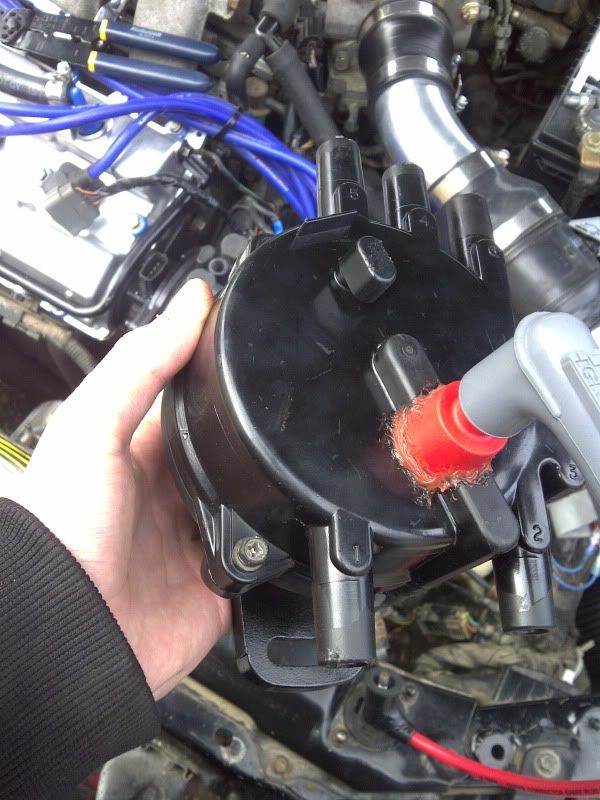
When i did my HEI mod with the external coil, my drill also slid off a bit and went beside the metal in the cap, i just took the drill and pulled it against the metal and let it rip, held it there untill i made a nice groove out of it, then took the little metal wire that came on the power tower, stuffed it in there all nice n dandy then notched the tower n screwed it on then filled all the gaps with RTV high temp silicone. also youll wanna cut off your coil knob thing that connects to the cap. i just cut it off and filled it with rtv and filled the hole on the cap for where the coil would of went in. works a-okay.
Like so. if u want a picture of the inside of the cap, lemme know. ill go take it off n snap a couple.
Like so. if u want a picture of the inside of the cap, lemme know. ill go take it off n snap a couple.

Re: HEI distributor cap modification
Ok glad to know I wasnt the only one to have this experience. Have some pics to help explain. This is Gro Harlems pic of the inside of his cap. The red dot represents the center of where he apparently drilled. His write up says there's a lot of ways to do it, he chose to go close to the center. So I figured that whole channel must have a metal band under the plastic, and if I just drill somewhere in the middle of that I'd be fine. So I chose to go a little further from center at the green dot, there's a square in the plastic and the edges are raised a bit so I figured its a good spot since it would stop my drill bit from sliding around before I started drilling. Turns out the metal that you should drill through is off center in the channel positioned like the highlighted yellow area. Or at least it is when you go further away from the center. 
I'm basically doing what cWs306 did and hoping for the best. But to others trying to do this I recommend putting the power tower exactly where Gro put his.
heres mine you can see how it wound up off center.

I'm basically doing what cWs306 did and hoping for the best. But to others trying to do this I recommend putting the power tower exactly where Gro put his.
heres mine you can see how it wound up off center.
-
cWs306
- Regular Member
- Posts: 622
- Joined: May 3rd, 2010, 2:09 am
- antispam: ~SPAM*SUX~
- Location: Saskatoon, Saskatchewan
Re: HEI distributor cap modification
yah mine turned out a little like that, just not as far off center. but if you stuff the wire in there nicely and get the screw nice and snug it should be fine.
Re: HEI distributor cap modification
I was annoyed that I had no way to know for sure if I had a solid connection. So I decided to just fill that hole and drill where Gro did. Only I was stupid, believing the metal in that channel was what I highlited in yellow in my previous post, I chose to go just a bit off center in the opposite direction. and the drill slid off on the opposite side. Now I was angry, and I have a spare cap, so in the name of science and frustration, I ground and burned away all the plastic in that area of the cap to see whats actually in there. This is what I found. 
So my original drill spot is a bad idea. it seems to have a cone of something like carbon or graphite there, in my pic it is not connected to the side going to the original post that went to the internal coil. This may have broke I cant say for sure, but I can say its a non conductive material, this explains why even my spare cap doesnt have continuity from that post to the center contact. When you add the MSD power tower that should have conductivity with the center contact. The band of metal where we should be drilling is not wide so you have to drill exactly in the center on the spot Gro Harlem chose in his write up.
So my original drill spot is a bad idea. it seems to have a cone of something like carbon or graphite there, in my pic it is not connected to the side going to the original post that went to the internal coil. This may have broke I cant say for sure, but I can say its a non conductive material, this explains why even my spare cap doesnt have continuity from that post to the center contact. When you add the MSD power tower that should have conductivity with the center contact. The band of metal where we should be drilling is not wide so you have to drill exactly in the center on the spot Gro Harlem chose in his write up.
Re: HEI distributor cap modification
Thanks for posting that picture, great. I suggest starting with a very small drill bit then going up in size. That should guarantee the drill bit won't slip off the metal.
2004 Subaru WRX Silver, stage 2, minty interior.
2002 Subaru WRX Blue, SOLD (best E test numbers I've ever seen)
94 MX-6. Sold
92 GS KLZE 5 Speed
96 GS 5 speed, KLZE, Sold
95 GS Minty Shape Sold
92 GS Sold
92 GS Parts Car scrapped.
Feedback viewtopic.php?f=37&t=66348" onclick="window.open(this.href);return false;
7477th member.
I know you believe that you understand what you think I said but I'm sure you realize that what you heard is not what I meant.
2002 Subaru WRX Blue, SOLD (best E test numbers I've ever seen)
94 MX-6. Sold
92 GS KLZE 5 Speed
96 GS 5 speed, KLZE, Sold
95 GS Minty Shape Sold
92 GS Sold
92 GS Parts Car scrapped.
Feedback viewtopic.php?f=37&t=66348" onclick="window.open(this.href);return false;
7477th member.
I know you believe that you understand what you think I said but I'm sure you realize that what you heard is not what I meant.