Vecia's 1994 MX-3: UPDATE - 8/06/12 New Picture!

In this section, Users can post worklogs for their vehicle and show users their projects. (MX-3 ONLY!). Please create only ONE topic when starting a project, and DO NOT create 2 worklogs for the same vehicle, even though they are different projects. READ THE STICKY!
Post Reply
User avatar
Vecia
Regular Member
Posts: 317
Joined: August 1st, 2010, 10:26 am
antispam: ~SPAM*SUX~
Location: Texas, USA
Contact:

Vecia's 1994 MX-3: UPDATE - 8/06/12 New Picture!

Post by Vecia »

Hello all! I'm Vecia and this is my first MX-3.

I'm really excited about this car as I've always wanted one. Not the V6 that I wish I had but this one is going to be awesome nonetheless.

This is going to be a long project due to finances and the fact that I use it as a daily driver but hopefully I will get this thing pristine over the next year.

The best part about this car is that I only paid 750.00 for it and most everything under the hood has already been replaced... (i.e. alternator, a/c compressor, power steering pump; etc.) which makes for a really good daily driver. The engine purs with no clicks or wines but the suspension is jacked up like I'm ridding on a piece of wood sliding down a dirt road. Needless to say, this is where I most likely will start.

The engine is the B6D 1.6 L (1.597) with no modifications thus far. Everything on the car except for the cheap, aftermarket, pioneer stereo is bone stock or OEM replacements (or equal).

As stated before, the suspension will be first for rebuild. Photos from Part 1 will be posted soon.

Here are some first images of the car after three days of cleaning. Paint was oxidized and had turned a pink color... no clear coat left. Had to wax so much my arm almost fell off. :)

Hope you guys like it.

Image
Image
Image
Image
Image
Image
Image
Image
Last edited by Vecia on August 6th, 2012, 9:31 pm, edited 13 times in total.
User avatar
AaronTietje
Regular Member
Posts: 1196
Joined: August 21st, 2009, 5:24 pm
antispam: No
Location: Prattsburgh NY

Re: Vecia's 1994 MX-3

Post by AaronTietje »

Nice clean car with no rust. Thats hard to find where I live up is salty NY. I love the dash btw. :mrgreen:
We all want to be fast and look cool. Cool changes but fast never does.
User avatar
Vecia
Regular Member
Posts: 317
Joined: August 1st, 2010, 10:26 am
antispam: ~SPAM*SUX~
Location: Texas, USA
Contact:

Re: Vecia's 1994 MX-3

Post by Vecia »

Thanks! She's definitely going to be a keeper.
User avatar
TrevorTheGallant
Regular Member
Posts: 183
Joined: March 11th, 2010, 2:43 pm
antispam: ~SPAM*SUX~
Location: British Columbia, Canada

Re: Vecia's 1994 MX-3

Post by TrevorTheGallant »

Decent car, clean find. :) Good Job! haha
User avatar
diezzel
Regular Member
Posts: 391
Joined: April 19th, 2010, 1:12 am
antispam: ~SPAM*SUX~
Location: Edmonton,Alberta

Re: Vecia's 1994 MX-3

Post by diezzel »

Sharp looking car.You cannot go wrong for the price.Power roof and all.Great score. :shock:
User avatar
Vecia
Regular Member
Posts: 317
Joined: August 1st, 2010, 10:26 am
antispam: ~SPAM*SUX~
Location: Texas, USA
Contact:

Re: Vecia's 1994 MX-3

Post by Vecia »

Okay, I know its been a while and I know I said I was going to start with the suspension but money as it is, I decided to tinker with the headliner. Ive seen a lot of inquiries regarding headliners and I may just be missing the "How-To" within the forums but I'll go ahead and post this here as it does have to do with my MX-3.

If this seems repetitive as what others have posted then just skip to the images... :)

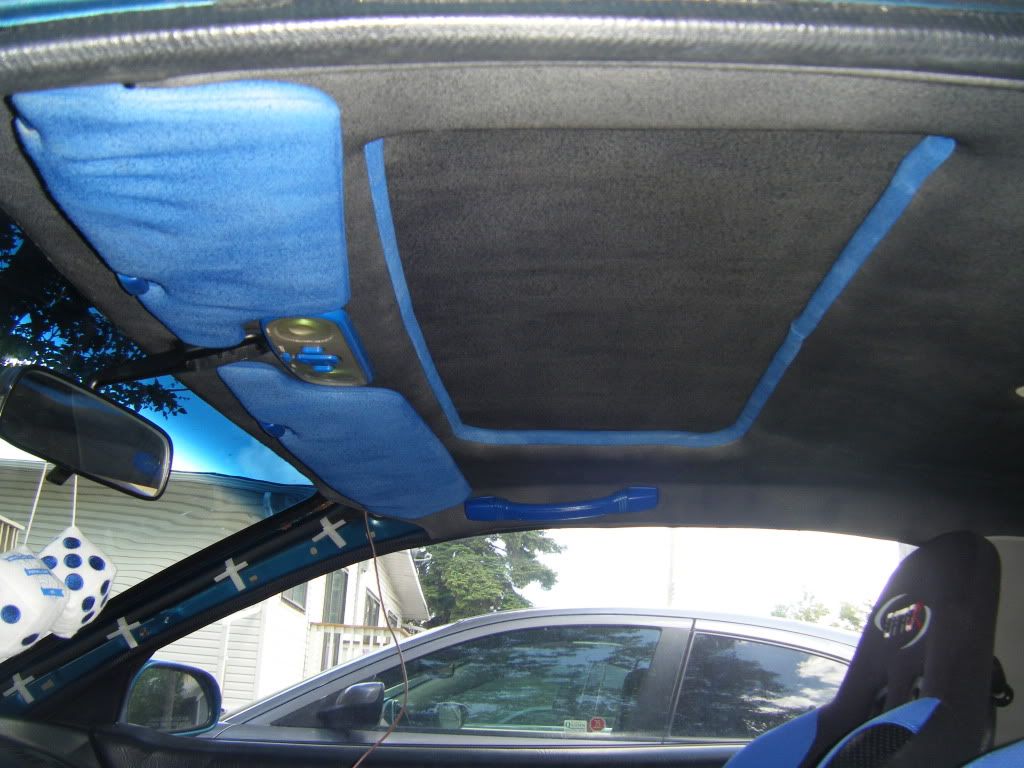
First I pulled the pillar trim on the right and left side of the windshield and then proceeded to remove the "OH-S**T" handle, rearview mirror and sun-visors with a #2 Philips Screw Driver. The lens over the canopy-lights and sun-roof switch pops out with relative ease just be careful not to break the tabs on the inner side.

Once these were removed, I made my way to the back, (Hold off on pulling out the canopy-light housing in case the headliner clips are no longer glued to the fiber-board) removed the seat-belt bolts and the one clothing hook on the driver side.

The pillar trims pop out fairly easy, just be careful because the metal clips might fall out of their seating and could end up at the bottom of your mid-body... (Not easy to get out)

The rear pillar trims dont have to be removed all the way, simply pop out the first, top few clips and the headliner should have some play and be in a position to be removed with ease.

Next pull the weather strip that guards the passanger and driver sides of your headliner down and away from the roof of the car.

The only thing that should be holding the headliner in now is the sun-roof interior sill and light housing above where the rearview mirror was. The housing has two clips; one on each side to the right and left. Firmly squeeze each side with your fingers and pull down and the Housing should unclip. If you need to use a flat-head (Sloted) Screw Diver, just be careful not to damage the fiber-board of the headliner.

Next the sun-roof sill can be removed simply by getting a good hold of it and pulling out away from the roof of the car.

After this is removed, you are all set. the headliner can then be pulled forward towards the windshield about an inch and the back 3 clips should un-seat from the roof. There you go! Simply pull the headliner out of the car and thats it!

Now for some pics!

This is my headliner after I pulled it out and removed the rotted fabric from it.
Image

I then scratched all of the old foam off using a wire brush. You have to be careful or you will tear the fibers in the fiber-board.
Image

This is the board after I cleaned it real good.
Image

Notice you can see the fibers real well. Thats what you want so your new, foam backed fabric will adhere to it cleanly and firmly.
Image

This is the finished product. I didnt take any photos of me applying the material because it was 104 degrees outside and I didnt have much time until the adhesive dried.
Image

The original headliner was grey but I decided to go with black as I thought the black with grey accents would look clean.
Image

Hope you guys enjoyed. More to come soon.
User avatar
Ryan
Senior Member
Posts: 7198
Joined: April 7th, 2008, 1:06 pm
antispam: ~SPAM*SUX~
Location: Manitoba

Re: Vecia's 1994 MX-3

Post by Ryan »

You should consider painting your domelight black, A pillars, B pillars, and finding a way to dye the rest of the stripping, so its all uniform...

painted domelight -> http://i278.photobucket.com/albums/kk82 ... GP0068.jpg" onclick="window.open(this.href);return false;

The headliner looks really good, btw. You put a lot of effort into it and did it right, I'm always glad to see that there are still people like that around...
Last edited by Ryan on August 20th, 2010, 12:21 am, edited 2 times in total.
Now with Moderator power!

Black '93 BP RS - wrecked, parted, scrapped.
Green GS - Sold.
Black GS - Summer DD/Race car - Fancy KLZE
Red GS - K8-ATX -> MTX-KLDE - Frakencar. Scrapped
White GS - Rusty. Parts. Scrapped
1997 BMW M3 - my summer baby
2002 BMW 325Xi - sold
2003 Forester Xti - EJ20K swapped.
Feedback
User avatar
solo_ryder
Senior Member
Posts: 6289
Joined: October 16th, 2004, 2:01 am
Location: British Columbia

Re: Vecia's 1994 MX-3

Post by solo_ryder »

WOW, you did an amazing job on that headliner! Can you post a link of some sort to show my what type of product you layed on the headliner? I would like to replicate this.

Car looks clean, keep it that way :)

- Ryan, I am gonna do that! Never thought of that
User avatar
Evo_Spec
Senior Member
Posts: 2504
Joined: December 30th, 2008, 3:41 am
Location: Calgary, Alberta, Canada

Re: Vecia's 1994 MX-3

Post by Evo_Spec »

Ryan wrote:You should consider painting your domelight black, and finding a way to dye the rest of the stripping, so its all uniform...

painted domelight -> http://i278.photobucket.com/albums/kk82 ... GP0068.jpg" onclick="window.open(this.href);return false;

The headliner looks really good, btw. You put a lot of effort into it and did it right, I'm always glad to see that there are still people like that around...
just to add, you can use black sharpee for the white lettering to make it black

it looks fan-freaking-tastic vecia, you wanna do mine too? =P
Last edited by Evo_Spec on August 20th, 2010, 1:36 pm, edited 2 times in total.
User avatar
Vecia
Regular Member
Posts: 317
Joined: August 1st, 2010, 10:26 am
antispam: ~SPAM*SUX~
Location: Texas, USA
Contact:

Re: Vecia's 1994 MX-3

Post by Vecia »

I got the fabric on ebay from a company called DGECO FOAM AND FABRIC. 72 X 60 inches for 23.00 bucks. As far as the spray adhesive, I used 3M 90 Heavy Duty Adhesive, 12.99 at Home Depot. All in all pretty affordable. Beats paying 100.00 to 150.00 to have it done by someone whose gonna do it the same way... ;)

Thats a good idea Ryan, about the black but for some reason I'm loving this grey accent. I might however at some point do the sill around the sun-roof red. Dont know yet. I'm gonna wait and see how it looks once I get further into the interior.
User avatar
SteeleMX3
Regular Member
Posts: 403
Joined: October 10th, 2009, 1:32 am
antispam: No
Location: Calgary, AB

Re: Vecia's 1994 MX-3

Post by SteeleMX3 »

I like the 2-tone interior, just for reference about the sunroof trim:

Image

That's mine, not sure if it helps but it does look good. May I suggest Duplicolour fabric spray paint? :mrgreen:
Image
1992 Mazda MX3 Precidia GS-KLZE :: Rockin' my world since 2009
viewtopic.php?f=46&t=72989 ---> Workloooogg
User avatar
AaronTietje
Regular Member
Posts: 1196
Joined: August 21st, 2009, 5:24 pm
antispam: No
Location: Prattsburgh NY

Re: Vecia's 1994 MX-3

Post by AaronTietje »

Nice job and good write-up. 8)
We all want to be fast and look cool. Cool changes but fast never does.
User avatar
Vecia
Regular Member
Posts: 317
Joined: August 1st, 2010, 10:26 am
antispam: ~SPAM*SUX~
Location: Texas, USA
Contact:

Re: Vecia's 1994 MX-3

Post by Vecia »

Sorry guys I haven't been around lately! Been working like crazy!

Doin' some work to the ole' girl in a few weeks; gonna start on the suspension. Thanks for being patient with me.

Got a friend doing the sun visors for me to match the headliner and will be doing the seats and carpet next month.

I did get a new stereo deck unit a month ago. Nothing special; BOSS 615UA / RDS615UA SOLID STATE MP3-COMPATIBLE IN-DASH RECEIVER WITH FRONT PANEL USB AND SD MEMORY CARD PORTS.

Believe it or not, this head unit is actually pretty freaking awesome. Works pretty good with my 5 1/2 inch kickers. I don't use many CDs as most of my music is on SD Cards and my phone so it works out well for me.

I will get some pics up as I start the work on my interior and the suspension and try to do some write ups on the seats and carpet due to the fact that I'm doing them myself. So be on the look out for that.

To you guys that PMed me on the parts I was looking for, sorry I never go back with ya. I'm gonna wait on those until I'm at that point. I have a lot of small dents in the body and guys down here want an arm and a leg to get them out so it looks like I will be doing that myself too. When I finish that up I will be seeking out that spoiler piece but I dont expect anyone to wait on me so no biggie there. If I have to settle for factory, I'm good with that.

Thanks again guys for being patient with me.
User avatar
ethand
Regular Member
Posts: 766
Joined: October 21st, 2010, 10:44 pm
antispam: ~SPAM*SUX~
Location: Western Australia

Re: Vecia's 1994 MX-3

Post by ethand »

only just came accross this worklog... awesome work with that headliner!! after reading this I'm thinking i might try it too. I dont have any problems with it, but the theme for my car is red/black, and my headliner is kinda light beige-ish colour, so that might be an idea to help match it all up a little better :)
Thanks again, and I look forward to reading your write-up on the seats - mine arent too bad, but again, they dont match the rest of the car, so am thinking of changing it all up...
Image
'92 JDM Eunos Presso - Zeke
User avatar
Nd4SpdSe
Senior Member
Posts: 11212
Joined: May 25th, 2002, 2:01 am
Location: Québec City, Quebec, Canada
Contact:

Re: Vecia's 1994 MX-3

Post by Nd4SpdSe »

Ryan wrote:You should consider painting your domelight black
You can get them with black controls, would look good to have a black-on-black domelight.
1992 Mazda Mx-3 GSR - 2.5L KLZE : Award Winning Show Car & Race Car ['02-'09] (Retired)
2004 Mazda RX-8 GT - Renesis Wankel : LS3 Coils, BHR Mid-Pipe + Falken RT-615K 245/40r18
2011 Mazda Mazda2 GS - 1.5L Manual : Yozora Edition (1 of 500)
2003 Nissan Xterra SE - 4x4 Supercharged : 2" Body Lift, 4" Suspension Lift & 33" MTR Kevlar
2001 Nissan Frontier SE - The Frontrailer : Expedition/Off-Road Trailer Project
Post Reply

Return to “MX-3 Worklogs”