Carbon Fiber Lamination Tutorial [Big pics, pls be patient]

A forum for posting automotive related Images & Video Clips. (Please keep it clean, no profanity or offensive material.)
Urbanconcept
Regular Member
Posts: 522
Joined: February 7th, 2005, 9:57 pm
Location: Toronto area

Carbon Fiber Lamination Tutorial [Big pics, pls be patient]

Post by Urbanconcept »

Ok so first off I just want to point out that the info I am presenting here is not my own. I have no idea where I found this information, but when I did I thought it was a good idea to copy and paste it into a word file. I recently came across this long lost file and thought everyone here would benefit from the sharing of this info. This is a DIY at your own risk and I am in no way, nor is the original author responsible for anything that happens to you or your parts if you should try to attempt this process. Also I haven't tried this out myself, but I am planning on it in the near future, so please don't ask me any questions about the particulars of the process.

So now that that is out of the way here goes....

Carbon Fiber interior is becoming more and more mainstream these days, so how do you stick out from all of the kits? Why customize and laminate your own parts. When done right, it can look far better than any of the kits on the market today. Here is how you do it.


The first step, obviously, is to decide what pieces you are going to laminate. The material of the piece to be laminated can also decide what resin you are to use also. A typical polyester resin WON'T stick to plastic. Some regular vinylester resins are more suited for plastics. You need to purchase supplies such as carbon fiber, sand paper, a surface prep wash (such as PrepAll), measuring and mixing containers, a couple of 2 inch wide paintbrushes, and resin. For resin, the easiest to work with while laminating an object is KleerKote from US Composites. It will stick to anything, has a uv protectant, and dries crystal clear.

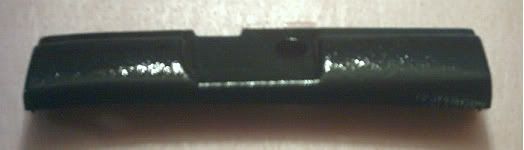
Now, to prep the piece that you will be laminating. Start off by sanding with a coarse grit paper (I prefer 80). This will give the resin something to bond to. After sanding, wipe the piece down with prep wash. Using a clean towel and more prep wash, go over the entire piece once again to make sure there is no remaining residue. (resin will only stick to the piece, not to dirt or grease on that piece.) Let it dry COMPLETELY.

Mix a little bit of the KleerKote resin. using a brush, apply a layer over the piece. KleerKote has a pot life of 35 minutes, so if you are using a different resin, your times may be a little different. Wait about 15 minutes until the resin becomes tacky like glue. Pot life is also dependent on your mixture ratio, temperature and humidity.

Image

While the resin is beginning to set on the piece, cut a piece of carbon fiber cloth for the project. Use masking tape to outline the area you will be cutting. Cut down the middle of the tape. This will keep the fabric from unraveling.

Image

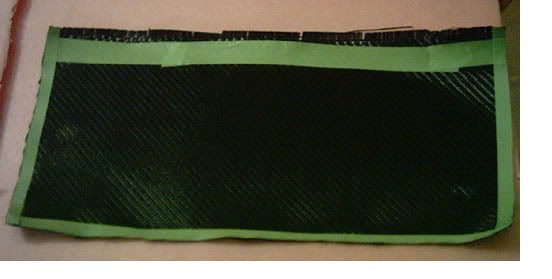
Now, after the resin is tacky to the touch, lay your carbon cloth ofer the piece. You are going to get a little sticky here. Use your fingers to press and form the carbon around all of the contours of the piece you are doing. After it fits satisfactorily, let it cure for about 1 1/2 to 2 hours. (Leave the overhang of cloth until it dries)

Image

After it is cured to the point that the carbon will not shift when touched, mix enough kleerkote to cover the piece. Use a brush to apply a liberal coat to the piece. This will seal the carbon and greatly reduce the chance of air bubbles in the finished product. After that coat is applied, let it sit for about 40 minutes.

Image

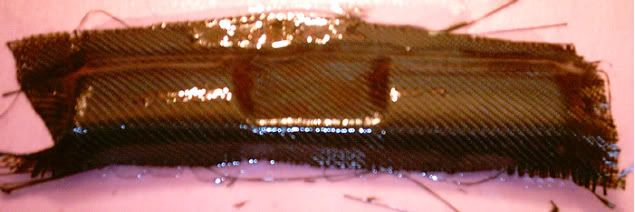
The next step is called a flood coat. You pour the kleerkote resin at the highest point of the piece and let it flow down. This resin is self leveling, so there isn't that much sanding to do later. Repeat this step 90 to 120 minutes apart until there is no surface texture over the weave. If you let the previous layer cure completely, you will need to lightly sand with a light grit paper (600 - 800 grit) so the next layer of resin has something to bond to. The below pic is after 2 flood coats. It will more than likely get 1 or 2 more before final sanding and buffing.

Image

After the piece cures overnight, you can trim the excess off with a pair of fabric shears. (its only one layer of carbon afterall. ) Trim the fabric short with shears and use a Dremel to take it even with the plastic around it. One final floodcoat helps to seal everything together.

Image

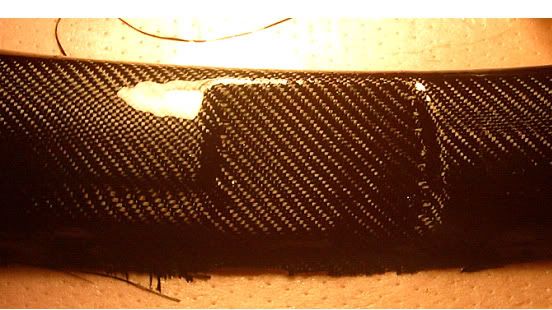
Notice the reflection of the light on the piece. This is before final wetsanding and there are still small waves in the resin.

After the piece is COMPLETELY cured, you can wetsand with 1500 grit, then 2000 grit until the surface is smooth. After that, 3M rubbing compound does a great job of taking off the haze that wetsanding leaves behind. You are now done!!

Image

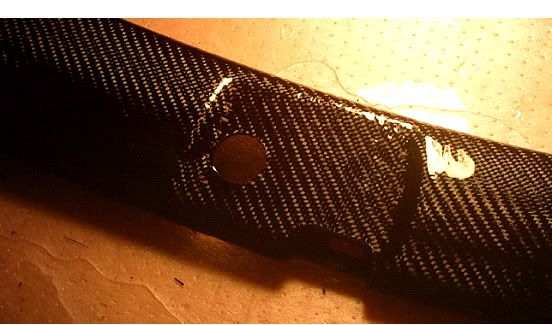
This is the piece after final wetsanding. (note how much smoother the reflection is) Just to make sure that there are no problems with this weathering and turning yellow, it is a good idea to have a paint shop spray it with a U.V. inhibitive clearcoat.
Friendship is like pissing your pants: Everyone can see it, but only you can feel its true warmth.
Image
User avatar
Mooneggs
Forum Moderator
Posts: 6128
Joined: August 10th, 2005, 10:08 pm
antispam: ~SPAM*SUX~
Location: Hillsboro, OR
Contact:

Post by Mooneggs »

wow this looks pretty useful! thanks for sharing

Those parts look as good as the ones I have paid to have wrapped... I just never took the time to figure out how to do this myself lol :roll:
User avatar
PATDIESEL
Senior Member
Posts: 4476
Joined: August 13th, 2001, 2:01 am
antispam: ~SPAM*SUX~
Location: Atlanta, GA.

Post by PATDIESEL »

Well hell. I've been waiting on some vacuum bagging parts to wrap some pieces. After seeing this I will try some of the smaller ones when I get time and let you guys know how it went. This is the same basic process I've used on some smaller fiberglass parts that I molded so it sounds very familiar and should be easy.
Image
ZE -strait neck,headers,2.5 exhaust,pheno spacers,lower cross member,GC coils,MS struts,Brembo slotted rotors,filled MS mounts,SS brake/clutch lines, CAI,to rear bat reloc,Hella headlamps,Hella DE fogs 180WHP
Urbanconcept
Regular Member
Posts: 522
Joined: February 7th, 2005, 9:57 pm
Location: Toronto area

Post by Urbanconcept »

I'm happy to share. And it's awesome that people will actually use this info for their own benefit. I could have kept it to myself and made parts and sold them, but since I have had so much help from other members on here, and I'm not really all about making a quick dollar, I decided to share!

So enjoy and I will post pics of my own trials!
Friendship is like pissing your pants: Everyone can see it, but only you can feel its true warmth.
Image
Urbanconcept
Regular Member
Posts: 522
Joined: February 7th, 2005, 9:57 pm
Location: Toronto area

Post by Urbanconcept »

PS I also have another tutorial for making carbon fiber panels using a different technique which also does not use vacuum bagging.
Friendship is like pissing your pants: Everyone can see it, but only you can feel its true warmth.
Image
User avatar
Vanished
Regular Member
Posts: 1826
Joined: July 4th, 2004, 2:01 am
Location: Saskatoon Canada

Post by Vanished »

well what are you waiting for! Post it up!

i'm going to try this...soon.
1992 Blaze MX-3 GS *R.I.P.*

1993 Blue 93 SE-ZE

http://www.cardomain.com/ride/2770987/2
colinsmx3
Regular Member
Posts: 1351
Joined: March 31st, 2007, 3:56 pm
Location: T.O Ontario!

Post by colinsmx3 »

hmnm so what is the full cost of something this size including resin and that other stuf!!
ImageImageImageImageImage
ImageImageImage
User avatar
PATDIESEL
Senior Member
Posts: 4476
Joined: August 13th, 2001, 2:01 am
antispam: ~SPAM*SUX~
Location: Atlanta, GA.

Post by PATDIESEL »

CF is about 20-30 bucks a yard if you buy an end cut, but can be more or less if you buy by the yard in a roll. Depends on what weave, how much you buy and where you get it from. E-Bay has some deals of course, but you have to watch what you are getting. The resin is relatively cheap. You can buy it by the quart or gallon. It plus the hardener is about 30-40 dollars for enough to cover a couple yards of fabric. Again, there are so many different types and manufacturers that the price varies. Tape, scissors, mixing cups, brushes and stirrers are cheap.
Image
ZE -strait neck,headers,2.5 exhaust,pheno spacers,lower cross member,GC coils,MS struts,Brembo slotted rotors,filled MS mounts,SS brake/clutch lines, CAI,to rear bat reloc,Hella headlamps,Hella DE fogs 180WHP
jamesmx3
Regular Member
Posts: 203
Joined: March 9th, 2007, 11:53 am
Location: preston, uk

Re: Carbon Fiber Lamination Tutorial [Big pics, pls be patient]

Post by jamesmx3 »

tried doing my door handle surrounds today, but i cant get it to stay in the 'bowled' part and around the edge i can have one or the other and its very frustrating, any tips??
1997 1.6 16v DOHC uk spec gs, 17" wolfrace triad, 2.0l probe s/s header magnaflow high flow cat, powerflow custom catback, CAI, zx2 struts w/ -40mm lesjofors springs

http://www.uk-mx3.com" onclick="window.open(this.href);return false;
User avatar
mx-3_4evr
Regular Member
Posts: 609
Joined: February 8th, 2008, 12:15 am
Location: Burnsville,MN
Contact:

Re: Carbon Fiber Lamination Tutorial [Big pics, pls be patient]

Post by mx-3_4evr »

let the resin dry a little bit more... It should be really tacky
hub_n_hun
Junior Member
Posts: 17
Joined: October 20th, 2006, 11:39 am
Location: Kitchener

Re: Carbon Fiber Lamination Tutorial [Big pics, pls be patient]

Post by hub_n_hun »

Looks very nice. Is it any different than working with fibreglass? Any different techniques?
User avatar
mymx.3
Supporting Member
Posts: 1757
Joined: May 3rd, 2004, 2:01 am
Location: Canmore, Alberta
Contact:

Re: Carbon Fiber Lamination Tutorial [Big pics, pls be patient]

Post by mymx.3 »

.................sorry guys................but carbon fiber...........

geeshhhhhhhhhhhhhhhhh......

it's going to go out of style very soon................................................


DEB
New owner of a "2008 Tiburon GT"
Image
User avatar
tehbrookzorz
Regular Member
Posts: 1561
Joined: April 29th, 2006, 6:59 pm
Location: Calgary, Alberta

Re: Carbon Fiber Lamination Tutorial [Big pics, pls be patient]

Post by tehbrookzorz »

I disagree. For those who have real cf parts that take off weight, it may be nice to have a couple smaller touches in the car that match in appearance. It ties everything together better. Carbon fiber has been around for awhile, and I don't know about you, but I still think the McLaren F1 is brilliant. 20,000 Whose Line Is It Anyway points to the next person to make an MX-3 body completely out of cf.

Oh, and the sport bike community is pretty big on cf too. It's not so much a weight thing because most of the components being replaced are plastic to start with. It's a matter of style.
Cody
Image
User avatar
boosted_bullet
Regular Member
Posts: 285
Joined: June 24th, 2008, 4:53 pm

Re: Carbon Fiber Lamination Tutorial [Big pics, pls be patient]

Post by boosted_bullet »

[quote="tehbrookzorz"]I disagree. For those who have real cf parts that take off weight, it may be nice to have a couple smaller touches in the car that match in appearance. It ties everything together better. Carbon fiber has been around for awhile, and I don't know about you, but I still think the McLaren F1 is brilliant. 20,000 Whose Line Is It Anyway points to the next person to make an MX-3 body completely out of cf.

i bet that guy would be oscar :lol:
chicks dig the rice!

-bullet
User avatar
93vtecklr
Regular Member
Posts: 924
Joined: March 23rd, 2009, 12:10 am
Location: Red Deer, Alberta

Re: Carbon Fiber Lamination Tutorial [Big pics, pls be patient]

Post by 93vtecklr »

I'm wanting to wrap a bunch of visually appealing pieces on my car and this post is a great read. Is there any recommendations from you guys on where to buy the hardener and resin? Is there a local (red deer and area) supplier for the cf cloth? And pat, what is this technique vacuum bagging?
Image
1993 Blaze Red SE, 17" blackie's, b+m sts, 45 deg 3" exh pipe/intake tube, K8ZE, aftmkt probe headers, magnaflow hi-cat, all 2.5" piping, magnaflow muffler.
1976 Datsun 620 p/u, full airride, Firestone 2600`s, 16ga fuel cell, Optima yellow top, AZ compressor, custom tubular frame with 9in step notch, 18" 100 spokes
1955 Willys Overland 4x4 P/U, '78 LT1 350 cu.in, fully restored.
Post Reply

Return to “Images/Videos Forum”