First Wide Body Kit for MX, im backkkk!!!!
-
Urbanconcept
- Regular Member
- Posts: 522
- Joined: February 7th, 2005, 9:57 pm
- Location: Toronto area
The pic on the left looks a lot better than the one on the right. I would change two things about it though. First I would make the front "mouth" all one opening, too many grills there makes it seem cluttered. The other thing I would also change is the grill just under the hood. I would make that little opening one opening as well instead of three seperate ones. I'm not trying to put you down or anything here just offering a friendly opinion  ( I guess it also helps that I'm almost finished my honnours degree in visual art). Oh, sorry one more thing. Instead of having the "mouth" of the front bumber angle inwards from top to bottom (like in the pic on the right) have it angle out from top to bottom. Know what I mean? That was a little confusing lol. Anyways, mad props to you for undertaking this widebody kit idea of yours. I'm loving the design so far. Good luck with the rest of it!
Friendship is like pissing your pants: Everyone can see it, but only you can feel its true warmth.


It’s coming along really well... I agree with the last post. It seems cluttered I myself dislike the fog lights the most. But in the end it’s your project. I look forward to seeing how this keeps progressing. Keep up the good work
Ever notice anyone driving slower than you is an idiot and anyone driving faster than you is a maniac?
01-03 Civic Projector Swap Tutorial
01-03 Civic Projector Swap Tutorial
-
marsinner
- Regular Member
- Posts: 219
- Joined: January 29th, 2002, 2:01 am
- Location: etobicoke
- Contact:
Sat Progress
Yes, i did go with the left side design,
Urbanconcept thanks for ure comments. I had a design of the 3 small grills under the hood as one big one, it didnt look good at all. I just didnt want that many openings, as well as the strength of the front is better with 3 small ones, rather than 1 large one and then 2 more underneath.
The reason i like the 2 centre openings and not 1 big one, because that was the reason my drift bumper ripped, unfortunately i made a mistake of driving to work one weekend when there was Snow on the road and the bumper just ate it all up until it ripped off!. I also had a bi&ch of a time finding a mesh to fit the huge opening on those.
I have a honours degree in graphic design and masters in 3d animation. But in the end its about taste and what each person thinks it looks good. But i have at least 20 different variations of almost the exact same thing.I do a lot of photoshopping before i finalize any part.
so progress today, I always run out of something, this time it was rivets. I decided to take out all the screws and rivet the entire pieces to the hood and rivet the bumper to the old bumper up top. Much better than using screws to anyone btw thats trying to attach peices to their car.
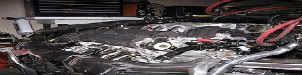
I sanded the hood and some of the bumper, then cut out the openings as previously photoshopped, not compeltely as some parts werent strong and i had to reinforce some corners with sheetmetal. I also molded the vents exactly to the hood, I really love how clean the hood looks right now. Gonna finish reinforcing it tomorrow and get all the holes exactly right. As well as I'll be puting the first layer of bondo and see how that goes. Here is result of today

 [/img]
Urbanconcept thanks for ure comments. I had a design of the 3 small grills under the hood as one big one, it didnt look good at all. I just didnt want that many openings, as well as the strength of the front is better with 3 small ones, rather than 1 large one and then 2 more underneath.
The reason i like the 2 centre openings and not 1 big one, because that was the reason my drift bumper ripped, unfortunately i made a mistake of driving to work one weekend when there was Snow on the road and the bumper just ate it all up until it ripped off!. I also had a bi&ch of a time finding a mesh to fit the huge opening on those.
I have a honours degree in graphic design and masters in 3d animation. But in the end its about taste and what each person thinks it looks good. But i have at least 20 different variations of almost the exact same thing.I do a lot of photoshopping before i finalize any part.
so progress today, I always run out of something, this time it was rivets. I decided to take out all the screws and rivet the entire pieces to the hood and rivet the bumper to the old bumper up top. Much better than using screws to anyone btw thats trying to attach peices to their car.
I sanded the hood and some of the bumper, then cut out the openings as previously photoshopped, not compeltely as some parts werent strong and i had to reinforce some corners with sheetmetal. I also molded the vents exactly to the hood, I really love how clean the hood looks right now. Gonna finish reinforcing it tomorrow and get all the holes exactly right. As well as I'll be puting the first layer of bondo and see how that goes. Here is result of today
[/img]-
mitmaks

- Senior Member
- Posts: 8704
- Joined: September 10th, 2001, 2:01 am
- antispam: ~SPAM*SUX~
- Location: Spokane, WA
- Contact:
nice progress
Magnum s/s lines, strut bars, carbon fiber bezel, indiglow gauge, Sony Xplod, inverted c/f hood, SRD lower tie bar '93 GS SE '95 Cobra SVT #2722 '68 Charger R/T 440
http://www.cardomain.com/id/mitmaks

http://www.cardomain.com/id/mitmaks
-
93_4Banger
- Regular Member
- Posts: 675
- Joined: September 15th, 2004, 2:01 am
-
fry_81

- Regular Member
- Posts: 1898
- Joined: April 22nd, 2004, 2:01 am
- Location: Barrie, Ontario, Canada
- Contact:
that hood is going to look amazing
1994 5spd GS Parts Car For Sale 800obo. e-mail for details. fry_81@hotmail.com
-
Gro Harlem
- Senior Member
- Posts: 3391
- Joined: November 30th, 2001, 2:01 am
- Location: Stuttgart, Deutschland
- Contact:
Prop's on all the hard work you are putting into this kit.
Can't wait to see the final product . It looks like you are coming damn close to mimmicking the actual supra veilside kit
Can't wait to see the final product
Noble Green Metallic 93' GS Hybrid, 91' 1.8 323
DONATE TO MX-3.COM
DONATE TO MX-3.COM
-
lennis
- Regular Member
- Posts: 31
- Joined: July 24th, 2004, 2:01 am
- Location: Sweden / Jönköping
- Contact:
Can´t be said to many times, very nice !
Keep working and updating.
Going to look insane
//Lennis
Keep working and updating.
Going to look insane
//Lennis
Mx-3 GS. CAI, dtm rear muffler, H&R spring with camber bolts. Painted interior, rebuilded front with gs lip and splitters. Real supra rear wing custom fitted almost done. blue homemade underkit neon, neon inside, glasfiber glovecompartment with the headunit in. XBOX + 7 inch screen .
-
marsinner
- Regular Member
- Posts: 219
- Joined: January 29th, 2002, 2:01 am
- Location: etobicoke
- Contact:
Update
The car isnt going to be that heavy, the hood is already little hevier, about 8 lbs heavier cuz of the fibreglass. but its sits fine on the anrchor when liften. The front bumper is going to be about 5lbs heavier than the reggular bumper. But thats with all the sheet metal reinforcements, so i know it wont snap like a twig if i hit something by accident. Which is abig deal for me, since i went through 2 bumpers in a year.
Anyways, ALL day today 8 hrs and it doesnt seem like I did anything, I sanded the hood, but i still need to add some fibreglass in areas cuz its not smooth enough and sturdy enough. I got all the openings exactly symmetrical, as well as the bottom of bumper and underneath is not done. I reinforced all the corners between the holes with sheetmetal pieces and screws(I grind the ends of after i screw it that way its better than rivet in certain areas)
its strong as hell i think. I fitted one of the openings for the fog light and i fitted both side blinkers for easy install later on.
Next well buy more fibreglass , i need about one more can, then bondo finally.
Oh and i changed by mind about cutting 3 little holes as in the previous picture, I cut 2 left the center out, it looks quite cool up close, like little eyes or MEAN notrils. comments? add that 3rd one?


-
Nallboy
- Supporting Member
- Posts: 730
- Joined: January 11th, 2003, 2:01 am
- Location: Jacksonville, FL Area
Yeah, I see that too, but this thing's looking great. Mad props to ya.
'93 GS sporting 31 ZE, 36 ECU, Millenia IM & TB, Beefed up tranny, Fidanza FW, CM Stage II-R, Al UDP, HS Headers, MF Hi-Flow CAT, 2.5" Piping, CAI, MGC Wires, MS Mounts, B&M SS, Bronzoils, SS B & C Lines, Brembos...more.
Oh yeah, I have a stock ATX 92 RS too.
"Everyone wants to live life in the fast lane; I have more fun weaving through traffic."
Oh yeah, I have a stock ATX 92 RS too.
"Everyone wants to live life in the fast lane; I have more fun weaving through traffic."