Here's a small write up (With minimal pictures) of installing the factory air conditioning into your AC-less MX-3.
This will be based on the 2nd Gen RS, however, the concept should be the same on 1st gen RS, GS and 2nd gen GS.
Begin first with a shopping cart. Locate a donor car, or donor parts. Here's a list from the junkyard of parts you'll need:
------------------------------J/Y Shopping Cart
Evaporator coil and housing (don't forget the little foam-lined clamps that clamp on each end of the box!)
AC Compressor and Mounting Bracket to the block
AC Dryer
AC Condensor (remember the bracket that mounts to the front frame!)
AC Relays
AC Cooling Fan (The fan located on the passenger side of the radiator)
All AC lines
Don't forget your parts from the auto store!
------------------------------Auto Parts Store Shopping Cart:
R134a Freon with gauge and adaptor
PAG46 Compressor Oil - 8oz
Belt - 1m size (store claims 90cm size belt but I found that to be significantly too small)
AC O-ring kit
Rent a vacuum tool (Optional)
AC Flush liquid (Optional)
Loctite 567 (Optional, for small fittings)
Loctite 271 (Optional, for large fittings)
7/16 14 Pitch Thread Tap and tapping tool
Four 7/16x14x1 bolts
------------------------------Prepping Your Equipment------------------------------
Be thorough with your equipment the first time around. Plug all your connections and fittings and clean up your equipment.
Blow out the trash from the evaporator coil and housing. Clean your compressor, ect.
Remember, there are no wire cutting/splicing involved. Don't cut any wires!
------------------------------Optional
While you have your system in pieces, now would be a convenient time to flush each individual component if you wish.
Use the vacuum and also the flush liquid to clean out each individual component and clean them. Be careful with the products you buy and follow their directions.
------------------------------AC Installation------------------------------
With everything prepped, cleaned and tested, gather together all your tools and some time. It's only a few hours' work.
In the engine bay, there are three plugged holes on the firewall, passenger side, next to the charcoal canister, that need to be unplugged (Rubber caps)
There are also cut holes in the firewall insulation that you can punch out with your finger.
One hole is for the high pressure side (the top) one for the low pressure (middle) and the last one is for the evaporator drainage hose (bottom)
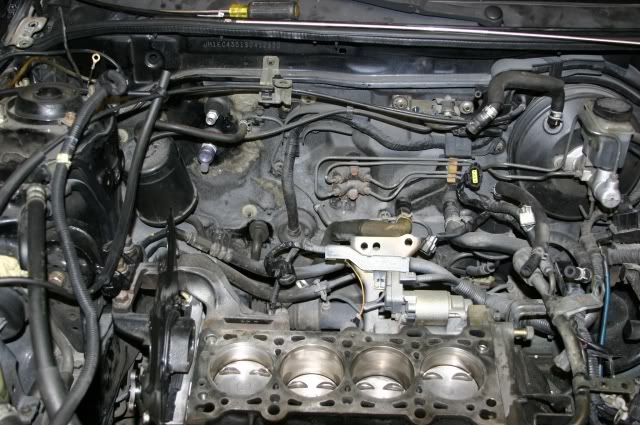
Pictured are the fittings through the holes in the firewall
------------------------------Interior
This guide will start from the inside out. In order to access the area for the evaporator coil's housing, first remove the glove compartment and the small frame surrounding the glove compartment.
To remove the glove compartment, it's pretty simple. Open it up, there's a small hinge on the bottom right corner. With the compartment open, push up on the hinge till it pops out of place. Slide it forward and out.
Now remove the two screws by the hinges, and two screws by the handle hinge.
Also remove the plastic shroud on the side of the dash, between the door and the dash and unscrew the last two screws of the shroud.
In place of the evaporator housing is a dual-pipe frame and plastic hosing from the blower fans.
Unbolt the pipe frame (they ARE possible to remove, but are a bit of a bother. Get creative.)
If you pulled the foam-lined clamps with the evaporator housing, first install those clamps on the blower fans before installation. Then align your evap housing's fittings with the holes on the firewall.
Fit the drainage hose first, as it will be a bother to bend it around any other time.
Then fit your high and low pressure fittings to the hole. A bit of wiggling and giggling and the housing will fit like a glove.
There is a plug on the evaporator coil housing as well as a plug in the car's wiring harness. locate the plugs and join them, they are there.
*Note: If you don't have your foam-lined clamps, use some ducting tape and tape the housing to the blower fans.
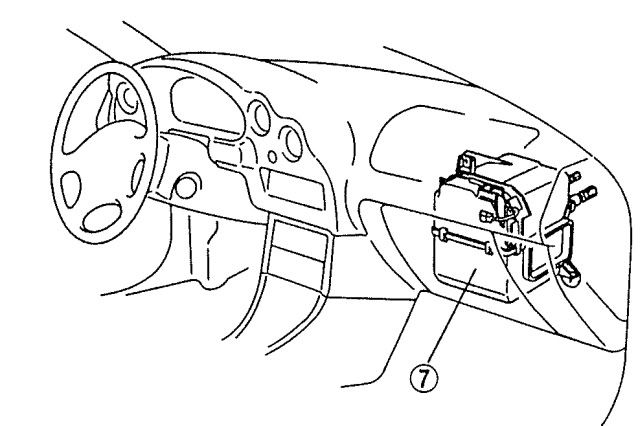
Diagram of Interior Evaporator Coil Box
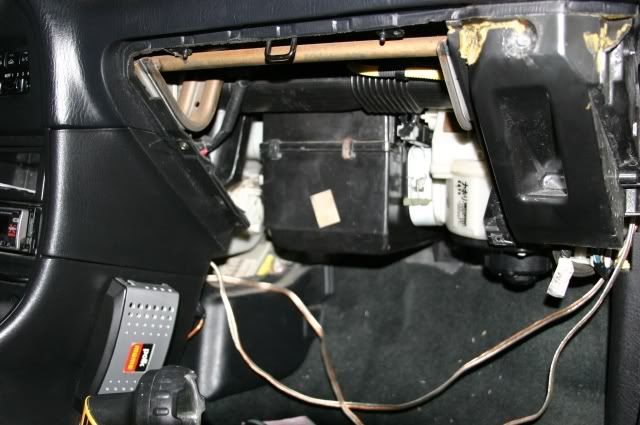
Image of installed Evaporator Coil
------------------------------Engine Bay
Begin with removing your radiator. Drain your coolant, remove the radiator support, unhook the top and bottom coolant lines along with the reservoir line and pull it out.
Now begin bolting your AC components to the car. Start with the compressor.
The compressor is a bit tricky. It requires a bracket that bolts directly onto the block.
Pulling the bracket isn't a problem. However the problem lies with YOUR engine block.
The block is pre-threaded for 10mm bolts. However, if you consider that your MX-3 has been setting in weather for 15 years, chances are those threaded holes in your cast iron block are toast.
This won't be an option. You will HAVE to tap out your own threads. Grab your 7/16th tap and tap your own threads in the pre-drilled holes on the block AND the bracket.. They'll tap out like butter and hold like the dickens.
Install your bracket and AC Compressor and verify it's secure on the block. Last scenario you'd desire is your compressor falling off while driving.
*Note: If you desire metric, use a 11mm or 12mm tap. Remember to match the thread pitch with your stock bolts, or purchase bolts to match your new thread pitch. This was written with Standard sizes as it's impossible to find the correct metric in the area
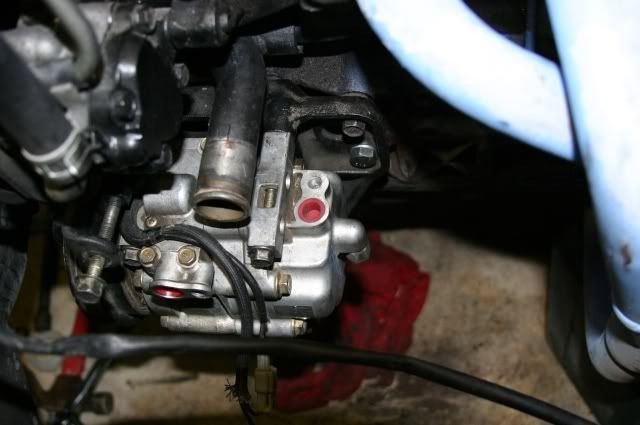
Compressor and bracket. Notice the different sizes of bolts and washers. This was before tapping, and is very unstable and unsafe. Tap that hole! /end innuendo
Now install your Condenser. It has pre-set holes on the bottom of the frame where it secures into, and if you remembered to save the brackets on the top portion of the condenser, secure it to the car.
Before you install your dryer, begin running the AC lines. Start from the low pressure line from the evaporator to the compressor. Install your new O-rings and place a dab of some of the PAG46 oil on them before installing.
------------------------------Optional: Use Loctite 271 on your large fittings to minimize leaks
Now run the large hose from the compressor to the condensor.
*Note: This hose is a bit of a bother. Remember how you removed the line originally, it wraps around some of the front frame.
Next, run the high pressure lines, starting from the compressor. Lube and install new o-rings as you run your piping.
------------------------------Optional: Use Loctite 567 on your smaller fittings to minimize leaks
With most of your lines set in place, install your dryer. Remember, o-ring, lube, Loctite. (optional!)
*Note: If you vacuumed out your compressor, add 6oz of PAG46 oil before you secure the top fitting.
Install your AC Fan to the radiator, and reinstall the radiator. Reconnect any fitting and hose you previously removed.
Your two relays are ready to be installed as well. here's the finishing touch, the magic that makes me tear. The relays are supposed to be secured right next to the evaporator fittings under the hood, but there are no threaded holes for them. Do what you must to secure it.
Plug your first plug into the high pressure line on the firewall leading to the evaporator
Second plug to the open plug next to the relays
Third plug to the compressor
Fourth plug into the AC fan
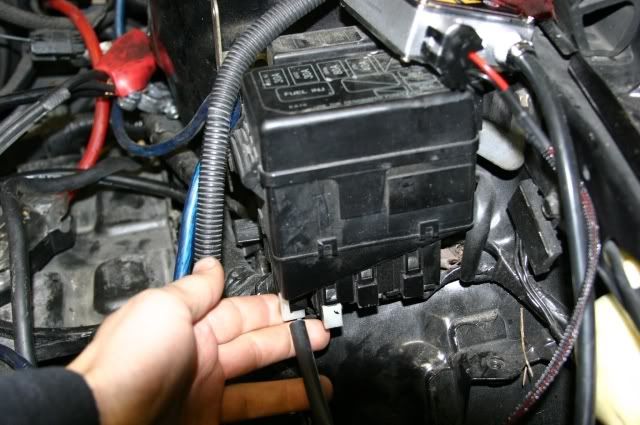
And the fifth plug into the bottom of the fuse box. The fuse box already has your fuse installed, just click the plug in place.
Install the ground wire by the relays.
Your engine's wiring harness doesn't have any connections for AC! Wait, *click* now it does. That easy!
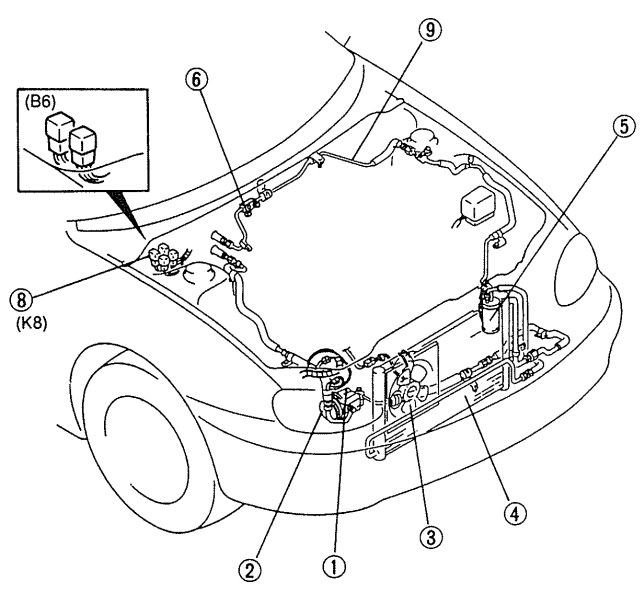
Diagram of AC system in engine bay for reference
Install your new "With AC" Belt
Now look over your work and double-check everything is plugged in, tightened, connected and ready.
Using the correct freon is a MUST.
The '95 Mazda MX-3 (And newer) utilized r134a freon. If you own a older model MX-3, check your AC lines first. The correct freon will be stamped on most of the larger lines, such as "r134a Only"
All of the R134a MX-3's utilized PAG46 oils. A quick call to a hospitable AC specialist and he was nice enough to pull up the requirements.
All these parts are obtainable at any popular auto parts store. I prefer Autozone myself.
If you do not own any AC charging equipment, purchase a bottle of freon (or two) which has a compression gauge and line.
Also purchase the premixed can of 2oz PAG46 and 2oz freon bottle.
Remove the gauge and line (don't break the seal on the bottle of freon it's on just yet) and use the premixed bottle first.
Attach the line to the low pressure line, (The fat line which runs from the compressor to the evaporator box) there's a fitting for the freon line to attach.
Start your car, break the seal and open up the valve on the freon bottle. Keep the bottle upright or sideways. Don't tip it upside down.
Turn your AC on, full-cold. This will circulate the freon in the lines. Your compressor should be making wierd noises for a few minutes.
Shake your bottle of freon randomly, until the bottle is empty.
Remove the line and attach it to your large bottle of r134a freon. Reconnect the freon to the low pressure line and let the freon circulate.
Charge your AC to 35-40psi. This is 35-40psi while the compressor is engaged (The PSI will jump high when the compressor is disengaged, ignore this. It's not the reading you're looking for)
I suggest running your air conditioning for a week or two, then recharging the system again. The initial recharge is just about guaranteed to have air in the lines.
*Note: Older R12 models, beware! You HAVE to evacuate and vacuum your lines before retrofitting to R134a to prevent your compressor from having the possibility of locking up.
Compressors cost money. Better safe than sorry.