ZX2 - Eibach install
Posted: November 14th, 2007, 11:51 pm
OK so my parts arrived today. Finally. I figured I'd write this up since when I was researching this job, I had a hard time figuring out what was what. Everything I read said how easy it is, and it really is, but there was no clear step by step write up. So here it is.

These are the shocks and springs. I ordered the escort springs because the price at oemfordparts.com for the struts was very good and I prefer the one-stop-shopping. Corksport has MX3 Eibach springs which are developed specifically for these struts and they may be better, but i think these wil be fine.
I started with a trip to the local pick n' pull looking for a ZX2, or at least a late model escort to see if I could find some good small parts. Rubbers, dust boots, bumpstops...etc. Low and behold there's a 98' Escort with low km's and bad collision damage in the middle of the passenger door.
I removed all four struts from the escort and disassembled them in the yard. I got all of the small parts for all 4 struts for less than $20 and in pretty good shape too.
These are the fronts after a wash...

These are the rears after a wash next to the same parts from a set of MX3 rears I had lying around. The parts are slightly different, but functionally exactly the same.
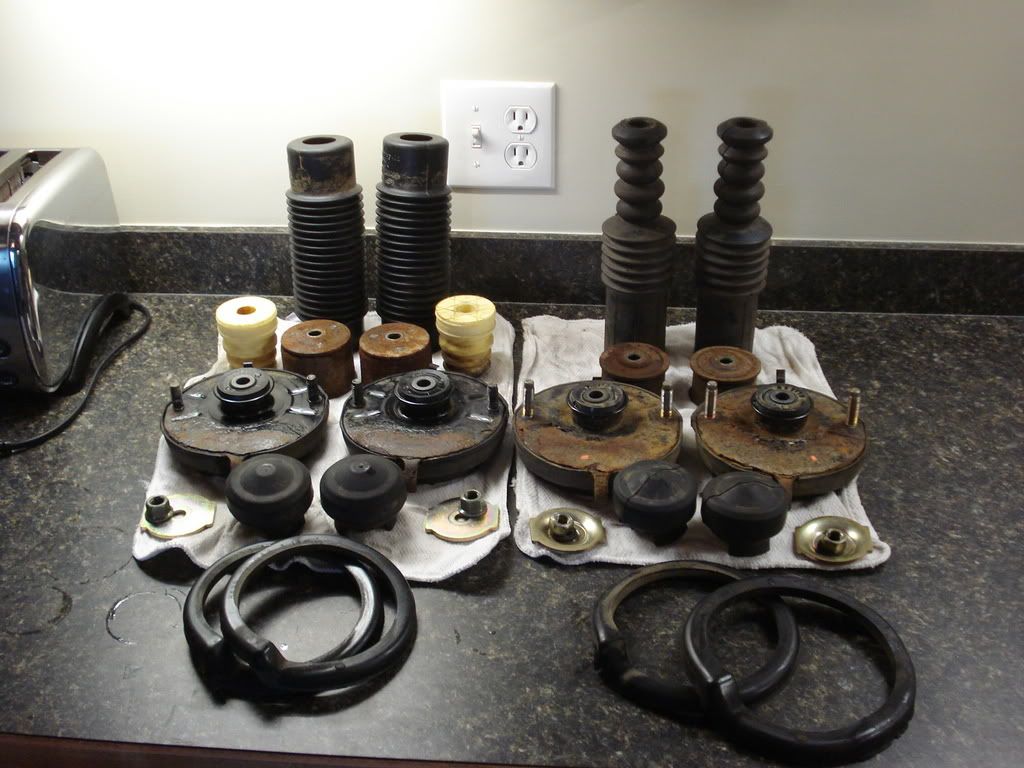
The escort parts are on the left and the MX3 are on the right. All I did was wash them in soapy water and rinse, then a dose of Armour All for all the rubber parts. I tried removing the rust from the metal parts and painting, but lost interest in that. I know I'm going to be replacing all of these parts in a couple years anyway.
UPDATE 2007/12/16: I've been asked a couple of times, so I thought I would clarify. The issue you've read about in other posts regarding having to enlarge some parts of your stock MX-3 struts to use on the ZX2 struts is due to the fact that the ZX2 strut rod is thicker than the MX-3 ones on all four wheels. On the front struts, the upper spring perches and the strut bearing must slide over the rod and the tension of the spring holds the spring perch and the strut bearing up against the strut mount. Therefore, you need to get ESCORT strut bearings and either ESCORT upper spring perches or enlarge the hole in your stock ones to fit said bearings. This same issue will also mean that the stock bumpstops will not fit over the ZX2 strut rods...or at least not easily. It is probably fine to just lube them up and force them on there if you want, it's up to you.
So I went to the local parts store on the way home and got a strut spring compressor. Basically you give them a deposit in the amount of the replacement value of the tool and they give it back to you when you return it. I think this practice is pretty common these days.
Strut Assembly
I started with the fronts. Place the rubber lower spring seat and the bump stop onto the strut. You may need a ltitle WD40 to help slide it on.
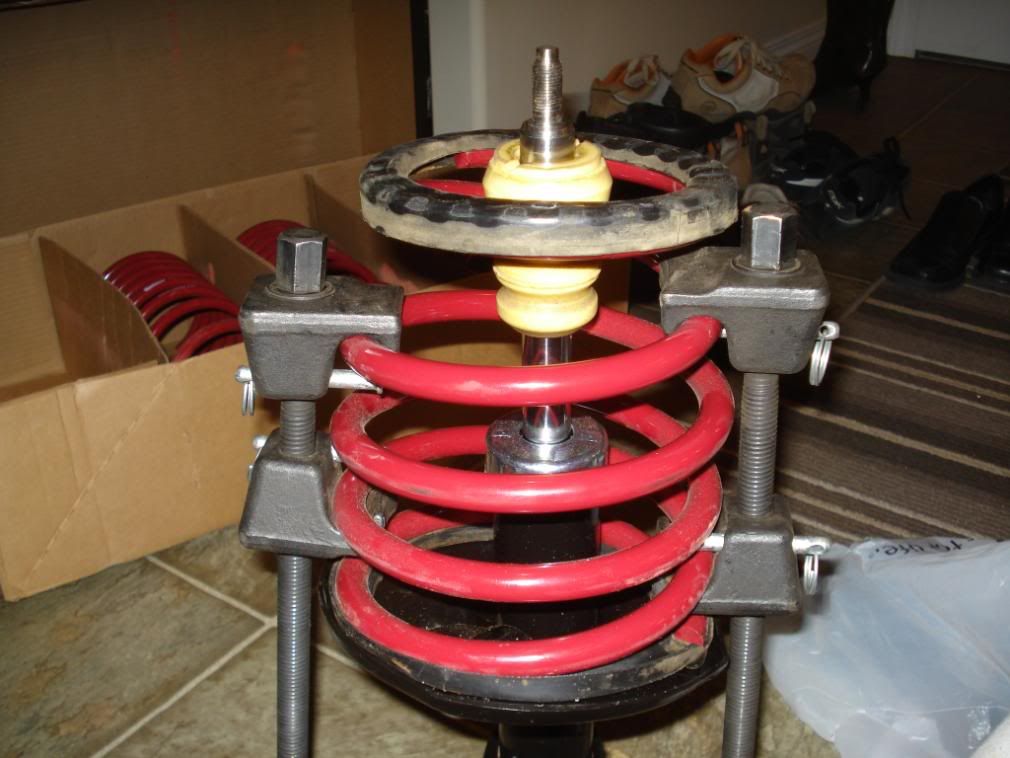
Place the compressor tools on the spring and begin to compress. Go evenly compressing each side 5-10 turns alternately. I had to compresst he spring quite a bit to get the top perch on. Just go slowly and evenly and it'll work out fine.
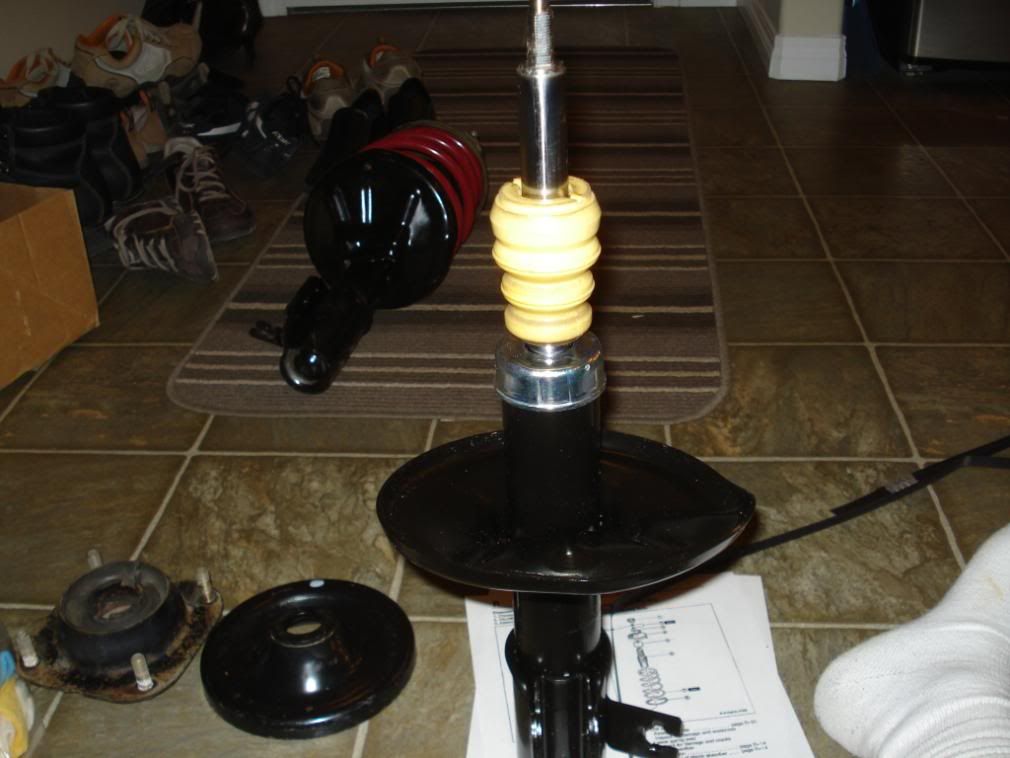
Place dust boot over the bump stop, the rubber spring seat on the top of the spring, and then the upper spring seat, thrust bearing and mounting block. Compress the spring until you can start the nut without effort. These parts will be too small if you take them off the MX-3 and try to put them on the escort struts. You NEED an escort bearing and either get an escort spring perch or enlarge the hole on your MX-3 perch.

Make sure the little hole in the top spring seat is pointed in the same direction as the spindle bracket on the bottom of the strut body. You'll notice that the mounting blocks are not symmetrical. There's a little nubby rubber bit that sticks up. When installed at the factory, that rubber nub faces the center of the vehicle. The Camber and Caster can be adjusted by changing the orientation of the strut mount.
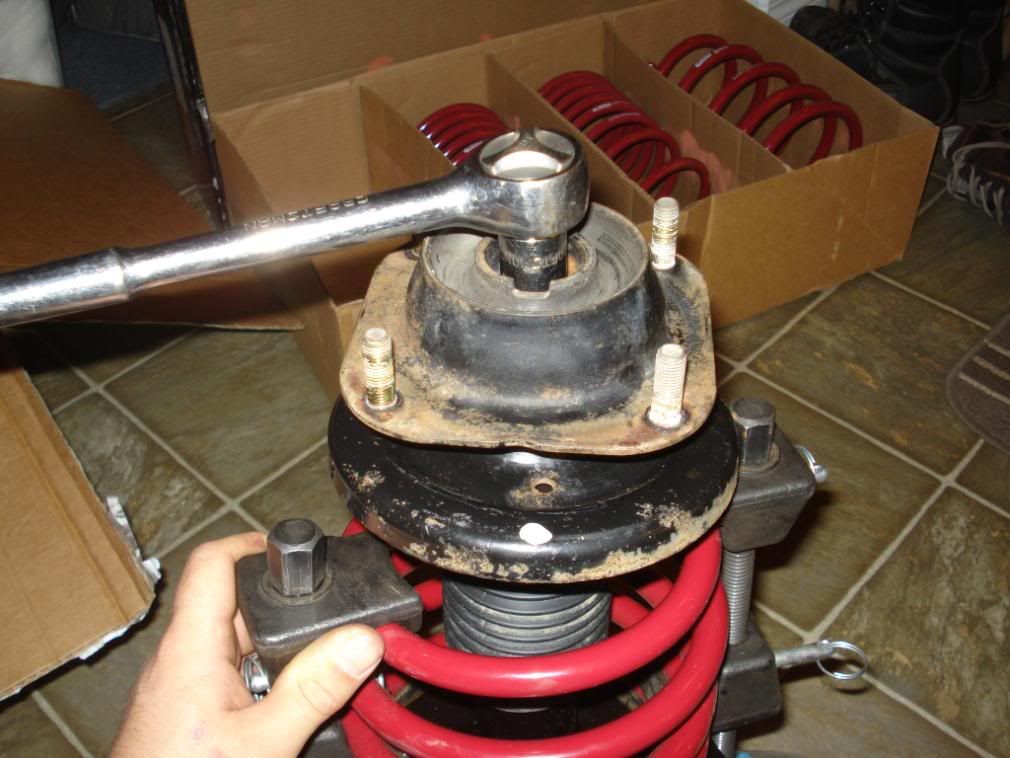
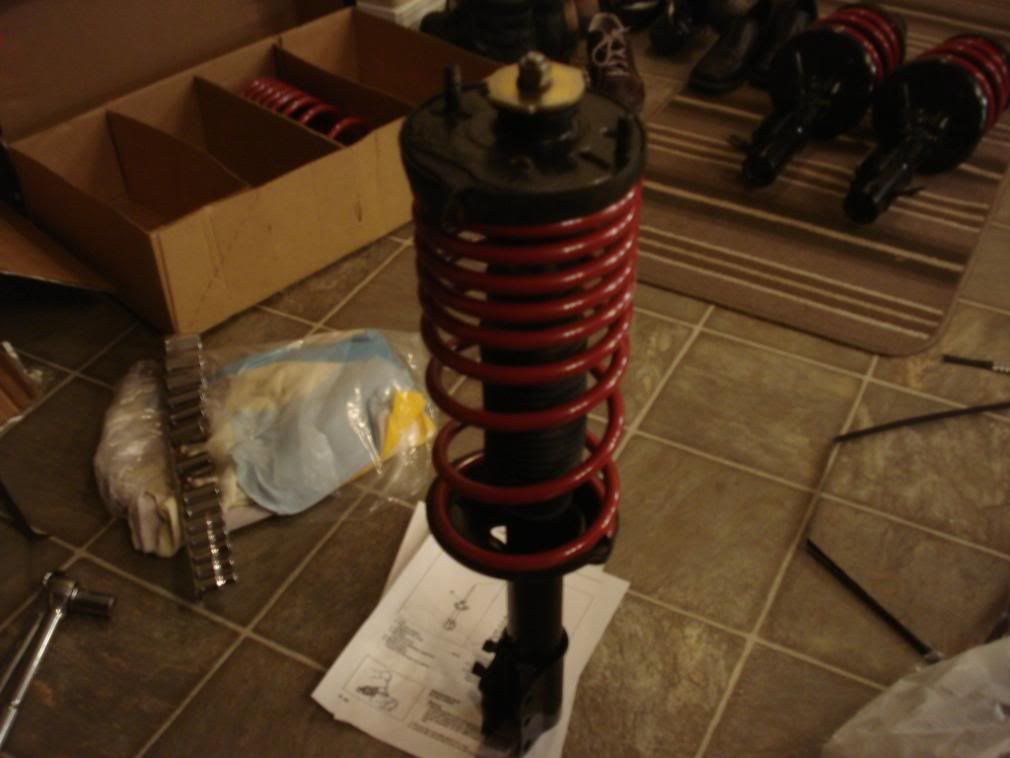
Tighten the nut and then remove the spring compressors. Keep in mind that the top nut is supposed to be torqued to 58 - 81 lb-ft. Unless you have an impact wrench, you cannot achieve that torque without a special tool or a vice of some kind. The piston will spin in the shock body. If you don't have access to air tools, use a little red locktite. I will be torquing these at my friends place before installing them.
The rears were even easier. I didn't even need the spring tool to compress the springs. I just assembled the parts and pressed down on the mounting block and I was able to easily start the nut.
The tab that sticks out from the strut mount must be aligned on the same side of the strut as the bracket. Once again, use some loctite if you can't use an impact wrench.
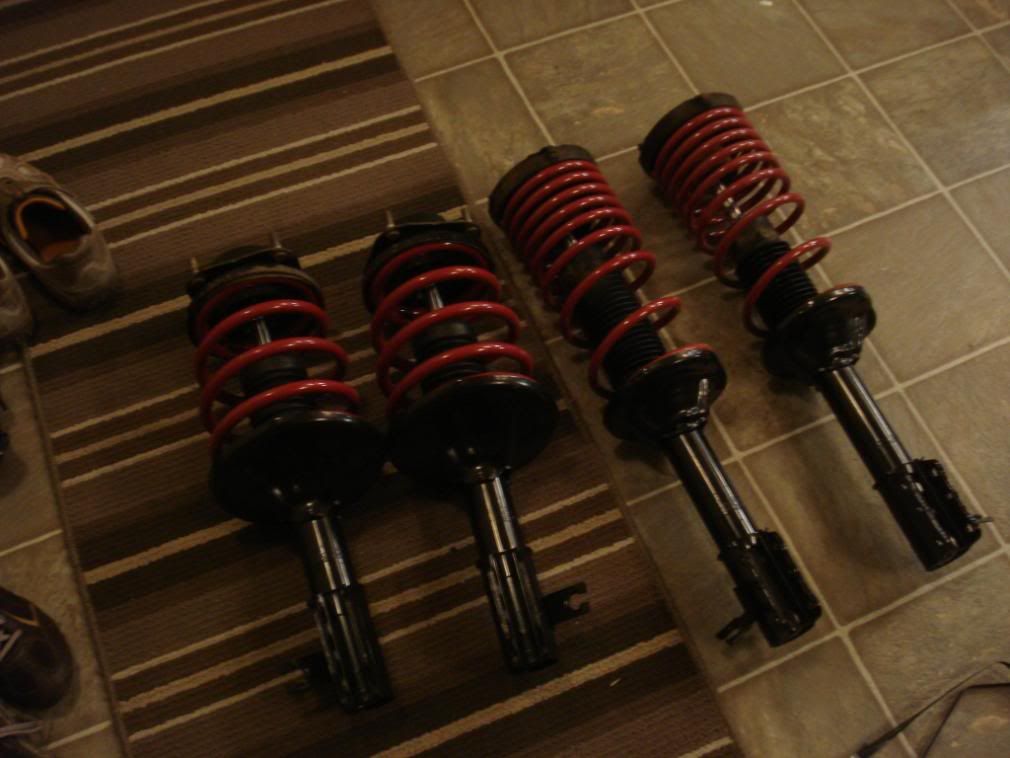
Here's the assembled struts. I used all the Escort parts from the junk yard. While I was at the junk yard I test fitted all of the parts to a gutted 96 mx3 they had and everything appears to fit perfectly.
Installation
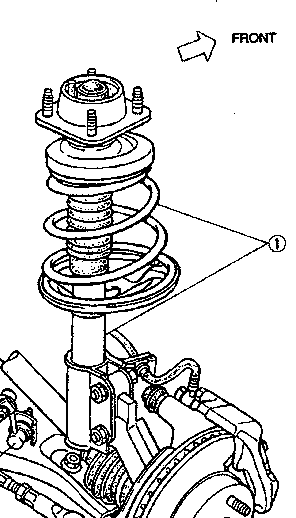
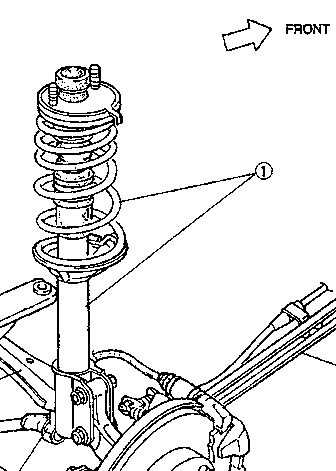
Again I started with the fronts. It was very cold this day so I didn' treally stop to take alot of pictures. I am going to use some diagrams taken from the shop manual.
Loosen the lug nuts and then raise the front of the car and support it on jack stands. Remove the front wheels and open the hood.
Disconnect the brake hose from the strut body. Just pull the clip away from the strut with a pair of pliers.
Remove the pinch bolts on the hub bracket first. Leave the top mount secured to the body of the car for this step as you will need the strut to be stable to reef on these bolts.
I found that I had to pry the knuckle out of the lower bracket. It's not extrememly tight in there, but I wasn't able to just pull it out. Once the strut is free from the steering knuckle remove the 4 strut mount nuts from the top of the strut and remove the old strut out from the wheel well. Be careful not to catch the brake hose and damage it.
Put the new strut into position and install the top nuts loosely with the direction indicator (the rubber nubby thing) on the inside. It will be helpful to have a little waggle room to get the pinch bolts into the new strut bracket. Install the pinch bolts in from front to back i.e. the nut faces the rear of the car.
Once the pinch bolts are in, tighten the top nuts ensuring that the accessories are reattached as well. Tighten the pinch bolts to the specified torque and reinstall the brake hose clip.
Do all that again on the other side. It's that easy.
Reinstall the wheels and lower the car. Make sure you remember to go around and torque the wheel nuts...common mistake. If you were not able to torque the strut top nuts (on the shock itself not the mounting nuts) now is a good time to retighten them with the weight of the car on the springs.
To do the rears, you have to access the top strut mount under the seatbelt brackets.
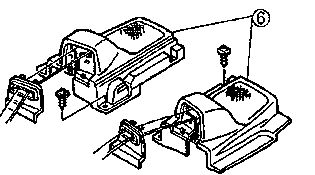
Only 2 screws and a couple of clips secure the trim which hides the seat belt retractor mechanism. Remove the trim carefully as the clips break off with alarming ease. You will have to remove the seat belt mechanism completely to access the top strut mounting nuts, but again, leave the top of the strut secured to the body until you've removed the pinch bolts.
Block the front wheels and raise the rear of the car. Yadda yadda...
Disconect the brake hose clip, remove the pinch botls then remove the top mount nuts. There is a little clip (not shown) on the top of the rear strut mount that hooks onto the body of the car and prevents the strut from falling when you remove the nuts. It's handy but also makes it a little challenging to get the old strut out and the new strut back up in the pocket. Once you get it in there though, it holds it up for you making it quite a bit easier.
Tighten everything up the same way you did in front and Bob's your uncle.
Before you reassemble the interior retighten the strut top nut on the actual shock if you haven't already torqued them properly.
Now go get a 4 wheel alignment or you're a dumbass.
These are the shocks and springs. I ordered the escort springs because the price at oemfordparts.com for the struts was very good and I prefer the one-stop-shopping. Corksport has MX3 Eibach springs which are developed specifically for these struts and they may be better, but i think these wil be fine.
I started with a trip to the local pick n' pull looking for a ZX2, or at least a late model escort to see if I could find some good small parts. Rubbers, dust boots, bumpstops...etc. Low and behold there's a 98' Escort with low km's and bad collision damage in the middle of the passenger door.
I removed all four struts from the escort and disassembled them in the yard. I got all of the small parts for all 4 struts for less than $20 and in pretty good shape too.
These are the fronts after a wash...
These are the rears after a wash next to the same parts from a set of MX3 rears I had lying around. The parts are slightly different, but functionally exactly the same.
The escort parts are on the left and the MX3 are on the right. All I did was wash them in soapy water and rinse, then a dose of Armour All for all the rubber parts. I tried removing the rust from the metal parts and painting, but lost interest in that. I know I'm going to be replacing all of these parts in a couple years anyway.
UPDATE 2007/12/16: I've been asked a couple of times, so I thought I would clarify. The issue you've read about in other posts regarding having to enlarge some parts of your stock MX-3 struts to use on the ZX2 struts is due to the fact that the ZX2 strut rod is thicker than the MX-3 ones on all four wheels. On the front struts, the upper spring perches and the strut bearing must slide over the rod and the tension of the spring holds the spring perch and the strut bearing up against the strut mount. Therefore, you need to get ESCORT strut bearings and either ESCORT upper spring perches or enlarge the hole in your stock ones to fit said bearings. This same issue will also mean that the stock bumpstops will not fit over the ZX2 strut rods...or at least not easily. It is probably fine to just lube them up and force them on there if you want, it's up to you.
So I went to the local parts store on the way home and got a strut spring compressor. Basically you give them a deposit in the amount of the replacement value of the tool and they give it back to you when you return it. I think this practice is pretty common these days.
Strut Assembly
I started with the fronts. Place the rubber lower spring seat and the bump stop onto the strut. You may need a ltitle WD40 to help slide it on.
Place the compressor tools on the spring and begin to compress. Go evenly compressing each side 5-10 turns alternately. I had to compresst he spring quite a bit to get the top perch on. Just go slowly and evenly and it'll work out fine.
Place dust boot over the bump stop, the rubber spring seat on the top of the spring, and then the upper spring seat, thrust bearing and mounting block. Compress the spring until you can start the nut without effort. These parts will be too small if you take them off the MX-3 and try to put them on the escort struts. You NEED an escort bearing and either get an escort spring perch or enlarge the hole on your MX-3 perch.
Make sure the little hole in the top spring seat is pointed in the same direction as the spindle bracket on the bottom of the strut body. You'll notice that the mounting blocks are not symmetrical. There's a little nubby rubber bit that sticks up. When installed at the factory, that rubber nub faces the center of the vehicle. The Camber and Caster can be adjusted by changing the orientation of the strut mount.
Tighten the nut and then remove the spring compressors. Keep in mind that the top nut is supposed to be torqued to 58 - 81 lb-ft. Unless you have an impact wrench, you cannot achieve that torque without a special tool or a vice of some kind. The piston will spin in the shock body. If you don't have access to air tools, use a little red locktite. I will be torquing these at my friends place before installing them.
The rears were even easier. I didn't even need the spring tool to compress the springs. I just assembled the parts and pressed down on the mounting block and I was able to easily start the nut.
The tab that sticks out from the strut mount must be aligned on the same side of the strut as the bracket. Once again, use some loctite if you can't use an impact wrench.
Here's the assembled struts. I used all the Escort parts from the junk yard. While I was at the junk yard I test fitted all of the parts to a gutted 96 mx3 they had and everything appears to fit perfectly.
Installation
Again I started with the fronts. It was very cold this day so I didn' treally stop to take alot of pictures. I am going to use some diagrams taken from the shop manual.
Loosen the lug nuts and then raise the front of the car and support it on jack stands. Remove the front wheels and open the hood.
Disconnect the brake hose from the strut body. Just pull the clip away from the strut with a pair of pliers.
Remove the pinch bolts on the hub bracket first. Leave the top mount secured to the body of the car for this step as you will need the strut to be stable to reef on these bolts.
I found that I had to pry the knuckle out of the lower bracket. It's not extrememly tight in there, but I wasn't able to just pull it out. Once the strut is free from the steering knuckle remove the 4 strut mount nuts from the top of the strut and remove the old strut out from the wheel well. Be careful not to catch the brake hose and damage it.
Put the new strut into position and install the top nuts loosely with the direction indicator (the rubber nubby thing) on the inside. It will be helpful to have a little waggle room to get the pinch bolts into the new strut bracket. Install the pinch bolts in from front to back i.e. the nut faces the rear of the car.
Once the pinch bolts are in, tighten the top nuts ensuring that the accessories are reattached as well. Tighten the pinch bolts to the specified torque and reinstall the brake hose clip.
Do all that again on the other side. It's that easy.
Reinstall the wheels and lower the car. Make sure you remember to go around and torque the wheel nuts...common mistake. If you were not able to torque the strut top nuts (on the shock itself not the mounting nuts) now is a good time to retighten them with the weight of the car on the springs.
To do the rears, you have to access the top strut mount under the seatbelt brackets.
Only 2 screws and a couple of clips secure the trim which hides the seat belt retractor mechanism. Remove the trim carefully as the clips break off with alarming ease. You will have to remove the seat belt mechanism completely to access the top strut mounting nuts, but again, leave the top of the strut secured to the body until you've removed the pinch bolts.
Block the front wheels and raise the rear of the car. Yadda yadda...
Disconect the brake hose clip, remove the pinch botls then remove the top mount nuts. There is a little clip (not shown) on the top of the rear strut mount that hooks onto the body of the car and prevents the strut from falling when you remove the nuts. It's handy but also makes it a little challenging to get the old strut out and the new strut back up in the pocket. Once you get it in there though, it holds it up for you making it quite a bit easier.
Tighten everything up the same way you did in front and Bob's your uncle.
Before you reassemble the interior retighten the strut top nut on the actual shock if you haven't already torqued them properly.
Now go get a 4 wheel alignment or you're a dumbass.