Page 14 of 22
Re: Ryan's Final Build
Posted: June 11th, 2011, 11:33 am
by Ryan
Decided to wrap my headers this morning.

Sprayed high heat clear over the welds, the fraying ends of the wrap (to hold them together) the SS hose clamps, and the flex piece.
I only wrapped around the oil pan, I don't much care about the rest.
Re: Ryan's Final Build
Posted: June 13th, 2011, 7:54 pm
by Ryan
Machine shop said #5 was waaay out (after the polish, and there were still gouges on the top) and they want to check out the rod too, make sure it wasn't spun too large.
So I had to remove the rear head (which I was trying to avoid)
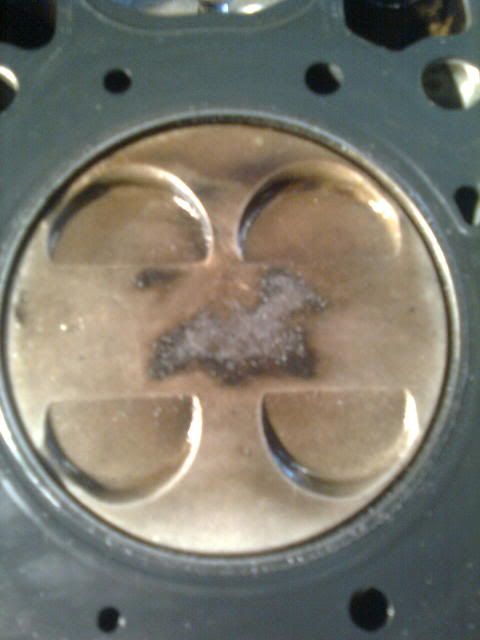
HG looked mint. Everything was mint. Cyl walls are still a bit rough, she's still working in. Piston rings are nice and free.
But I noticed some strange combustion patterns...
Cyl 1

Cyl 3
Cyl 5
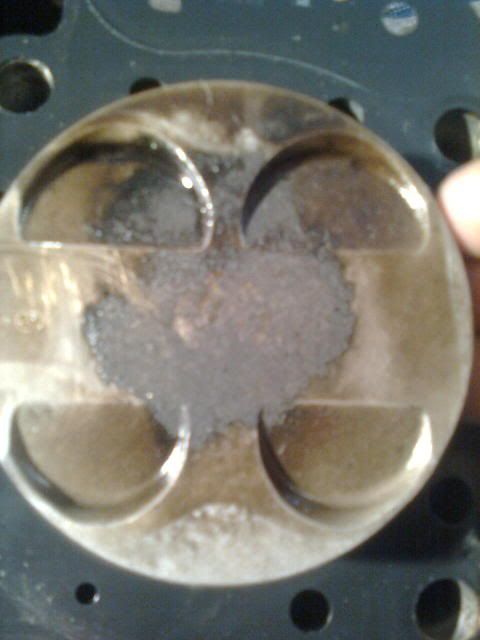
Now, I take this to be carbon build up... It would allow lots of extra oil past at this point, that could be it.
Why are they unequal?
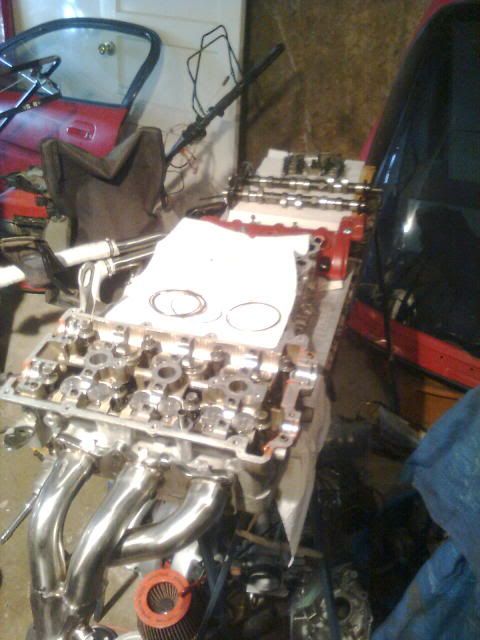
here's the parts that came off.. I can tear down a head in 10 mins...
Re: Ryan's Final Build
Posted: June 15th, 2011, 12:55 am
by Ryan
Crank rod bearings went 0.020" under. Mains can stay standard size. New bearings all around, rod will be checked out/replaced tomorrow, and then I get my parts back. Oil pump is in Winnipeg, so it will be here this week.
Engine will go back together, and then it might make an 8 straight hour trek to Thompson, MB, where it will sit for a month and then come home with me. I'm working up there, and I may need to drive myself.
Re: Ryan's Final Build
Posted: June 18th, 2011, 3:21 am
by Ryan
Bearings arrived just in time.
Put in a crankshaft and installed one head, and had it ready to install in 6 hours with a helper. Not bad. Thats a lot of picky TTA specs to cover.
She'll be in tomorrow hopefully before noon if I can swing it... or I don't decide to sleep in. This car goes on an 8 hour trek on monday at 3:00 AM. I'll need to do an oil change half way there.
Re: Ryan's Final Build
Posted: June 18th, 2011, 5:46 am
by WhiteFinish
You're becoming a true expert in this

Perhaps you could make a topic about some tips and tricks for other people who do this in the future.

Re: Ryan's Final Build
Posted: June 18th, 2011, 10:09 am
by Ryan
The most recent one I discovered:
When installing a crankshaft, push all of the pistons to the top of their bore (But not out of the motor if the heads aren't on!) except a pair of them. Get them on the crank properly, lower the crank to the mains at a rotation so those two are at BDC, and then pull up the other pistons as you try to align them one by one.
You need two or three sets of hands if you don't want to swear at it.
Use whiteout to mark bolt heads for TTA (torque to angle)
Motor goes in the car today.
Re: Ryan's Final Build
Posted: June 18th, 2011, 12:05 pm
by Daninski
Re: Ryan's Final Build
Posted: June 18th, 2011, 12:22 pm
by Dark_Rider2k3
while your at it, I can give him my blown BP and we can ship him a lot of projects

Re: Ryan's Final Build
Posted: June 18th, 2011, 12:39 pm
by Ryan
I'll just quit school for y'all. No biggie.
And from my record so far, you don't want me building engines only once

I need to befriend and old mechanic and wait for him to die so I can inherit his tools!
Re: Ryan's Final Build
Posted: June 18th, 2011, 2:51 pm
by DeadMaker
So the Championship Winner in technical/performance is Ryan!!

Re: Ryan's Final Build
Posted: June 18th, 2011, 4:53 pm
by Dark_Rider2k3
If I'm correct it should be just about done by now. Last I heard from him he was putting the Driver's side axle on

Re: Ryan's Final Build
Posted: June 18th, 2011, 7:15 pm
by Ryan
I can't shake code 69, I think it might have to do with my Stoker100 chip.
I've replaced both the green and black sensors with known good units.
replaced my chip with the KL55 again, now it runs more rich than the Stoker, and the CEL doesn't flash in diagnosis mode, it just does... nothing. Stays lit, like the car doesn't realize its in diag.
dumb a-- car, I'm sick of this KL BS. the K8 was seamless.
Re: Ryan's Final Build
Posted: June 18th, 2011, 8:22 pm
by Ryan
Okay, it was my fault, like usual. One pin on the EPROM was folded beneath instead of being in its slot, and now it works, and DOESN'T throw 69, so I know its the Stoker chip...
damnit.
Still idles at 3k.
bugs bugs bugs...
Re: Ryan's Final Build
Posted: June 18th, 2011, 9:21 pm
by Ryan
Remembered the purge solenoid hosery, and fixed the brake booster hose, and tried again to re-set the idle, but it seems to instantly die when tuned down to 10 degrees advanced.
I don't know....
Re: Ryan's Final Build
Posted: June 19th, 2011, 3:09 pm
by WhiteFinish
Maybe obvious, but is your sparkplug setup in the correct order?