onlytrueromeo's '92 GSZE

In this section, Users can post worklogs for their vehicle and show users their projects. (MX-3 ONLY!). Please create only ONE topic when starting a project, and DO NOT create 2 worklogs for the same vehicle, even though they are different projects. READ THE STICKY!
User avatar
onlytrueromeo
Senior Member
Posts: 2756
Joined: May 16th, 2007, 10:05 pm
Location: Albany, NY

onlytrueromeo's '92 GSZE

Post by onlytrueromeo »

I feel its about time to start a worklog. This is my 2nd mx3, I don't have a worklog for my first one and I sold it just a few weeks ago. I didn't do much on that one anyway. I've had my 92 since June 2008, and have since done quite a bit of work. Unfortunately, I don't have all the pictures because I'm not good at keeping track of them and my computer died last month.


Here is what the car looks like today! (Nice and rainy out)
Image

I bought the car off ebay for $800 delivered to my door. When I bought it there were ALOT of problems. The engine ran but blew oil all over the engine bay, and this is not something that had just started. The oil in the engine bay was at least 1/4 inch thick, and up to 1/2 inch in some places.

The rear struts were blown, so I knew I had to put on a new suspension.
Moonroof didn't work.
Carpet was gross and had mold (that quickly grew into a large problem)
Shifter was falling through
Many dents
Broken front lip
Bad ball joints and tie rod ends
Bad brakes all around
1 bad axle, other on its way out
Needed new clutch
Had 12/16 stripped lugnuts
Peeling white paint
1 Broken strut mount
Rear wiper sprayed and front wiper sprayer didnt work
Radio didn't shut off so it drained the battery
Probably more that I missed

Here is me working on her the day after I got it. I can't find the pictures from the ebay listing.

Image

I took out the engine, stripped the interior and disassembled alot of the car within the first few weeks I had her.
Image

It took me 2-3 weeks just to clean and prep the engine bay for paint. It was gross, there was alot of rust and more than alot of sludge/oil/grime/gross
Image


More to come I have to go to Dinner!
User avatar
Savin
Regular Member
Posts: 1580
Joined: November 18th, 2007, 3:05 pm
Location: Crown Point, IN (Chicago area)
Contact:

Re: onlytrueromeo's '92 GSZE

Post by Savin »

Yay! 'Bout time you start a worklog. It looks good. Rims look pretty good on it too.

Hurry up with dinner, I wanna read more! :D
'95 MX-3 RS - Project "Déjà Vu" Destined for the scrapyard.
'93 MX-3 GS - SOLD!
'93 MX-3 GS SE - Parts car!
'94 MX-3 GS - Scrapped
'94 MX-3 RS - Scrapped
'96 Sunfire SE - Scrapped
'03 Sunfire SE - Deathtrap
'95 Cavalier Base - Scrapped
'94 Thunderbird LX - Collects dust
'89 Mustang GT - SOLD!
User avatar
onlytrueromeo
Senior Member
Posts: 2756
Joined: May 16th, 2007, 10:05 pm
Location: Albany, NY

Re: onlytrueromeo's '92 GSZE

Post by onlytrueromeo »

Dinner was good...went to a mexican place right around the corner.

Now where was I...

I am missing so many pictures :( It's sad. It may not look like I've done alot on the car, but I spend 3 months working on it under a carport this summer.

Here is another shot of the engine bay after I cleaned it up a bit.
Image

What did I do to get it clean? Well it was a multistage process. The grime all over was GROSS. First I tried simple green and a garden hose...did not work so well. I upgraded to a heavy duty desgreaser (Purple power, then an orange cleaner, then some other brand) and it cut the top layer, but didnt touch the stuff underneath. I bought some brake cleaner and tried that, it kinda worked - definitely better than anything so far, but it was very expensive, smelled horrible, was rough on the hands (I bought some nice chemical gloves after this) and not to mention bad for the environment.

My next step, which was equally frustrating, was a pressure washer. Sure, we've all seen how well pressure washers work to remove gunk from wood, concrete, etc, so I thought that if I sprayed degreaser on the engine bay, scrubbed it in a bit, and powerwashed it, it would be a piece of cake...WRONG! It hardly cut into the grease at all..again it only cut away the top layer. I realized what was needed was ALOT of elbow grease. I went and bought a nice pack of different sized "pipe cleaning" brushes, a heavy duty scrub brush and 2 packages of dollar store toothbrushes. I spent the next 2 weeks scrubbing away at every crevice removing every spec of gunk I could find. I kept the hose by me and just kept spraying it after I'd scrub for awhile. After I was done, I tried the powerwasher again, and it cleaned things up nicely.

I don't have a final pic, but this was when I was close to the end. Notice the attention to detail - I removed quite a bit in preparation to paint the entire front end.
Image

My next step was to use a nice rust inhibitor. I got the metal ready stuff by POR-15.
Image

It's great stuff. Put on a few coats, taped off all the essentials, removed the wiring harness coming through the firewall and undid MOST of the rest of the wires (so I had less to tape off). I quickly taped off the rest of the car, but I wasn't too concerned because I was planning on spraying the rest of the car at some time in the future.

I went to my local harbor freight and bought myself a cheap spray gun.
Image

It was kind of a pain in the a55 to use, but I couldn't expect much for $20. I had no experience with spraying before. I then went to my local NAPA and approached the paint professional...
"Hi! How can I help you today?"
"Um...where to start. I want to paint the engine bay of my car outside under a carport with a cheap spray gun. I have no experience with this but want to get the best I can for my money. I guess I don't care if the paint isn't the shiniest paint in the world, but I want it to hold up well enough to all sorts of conditions. I guess I will need a primer for this too...oh and what kind of prep work do I need to do?"

Needless to say the guy laughed at me a bit because I had no idea where to start. Truth is, I had done some research, but I was still very undecided. I wanted the best rust inhibiting primer and paint combo I could afford. After talking to him for a good 45 minutes, I rejected any sort of single or double stage professional paint that they would mix up for me there...and wait straight to POR-15.
Image

The beauty of this product was that I didn't need to do ANY prep work, I didn't need to use a primer and it was the TOUGHEST paint the guy knew of. The paint is advertised like this:
"POR-15® is a high-tech, high performance rust-preventive coating designed for application directly on rusted or seasoned metal surfaces. It dries to an incredible rock-hard, non-porous finish that won't chip, crack, or peel, and it prevents rust from recurring by protecting metal from further exposure to moisture.

Use it to coat rusty frames, floor pans, farm equipment, marine equipment, or even a heavily corroded battery tray.

POR-15® is sensitive to UV light (sun) and must be topcoated for prolonged exposure to sunlight.
Topcoating is not required for areas not exposed to sunlight."

There is also a warning on the label that says to use gloves because "once the paint dries to your skin the only way it will come off is with time. Expect at least 2 weeks"

True enough, I had splotchy black hands for the next 2.5 weeks!

I had to call the manufacturer to find out how much to thin the paint. Turns out they require their own special "solvent". From what I remember, it doesnt need much thinner to spray it. I sprayed my engine bay in 3 coats of the POR 15, including the front frame and insides of my fenders (also the part where leaves tend to collect by the doors)
Image


I dont have a picture of the completed engine bay at the moment (I might be able to find some when I go home tomorrow) Right now, this is what I took a few hours ago in the fading sunlight.
Image

Yeah, my engine bay still needs alot of work...all in due time over Christmas break!


Time for another pause in the worklog - girlfriend wants me to clean the kitchen! I wish I hadn't lost my pictures!
User avatar
onlytrueromeo
Senior Member
Posts: 2756
Joined: May 16th, 2007, 10:05 pm
Location: Albany, NY

Re: onlytrueromeo's '92 GSZE

Post by onlytrueromeo »

The rims need quite a bit of polishing...I got them really cheap to replace the rims on my first mx3 below...
As you can see, I needed a bit of help. Those painted hubcaps were the WORST. Stupid kid I bought it from painted them like that...
Image

The rims I have now are 15x7" american racing rims. They are a bit scuffed and nicked, but aren't bad. I have them mated w/ some Goodyear Triple Tred Assurance Tires.
User avatar
onlytrueromeo
Senior Member
Posts: 2756
Joined: May 16th, 2007, 10:05 pm
Location: Albany, NY

Re: onlytrueromeo's '92 GSZE

Post by onlytrueromeo »

OK, well it's been a long time since I updated, and I never finished explaining how I got to where I am now! The above car was my first MX3, and I do miss her. 40MPG ftw! The ZE gets nowhere near that...so anyway

After painting my engine bay, I went out and bought new tie rod ends, ball joints, rebuilt my front calipers, put on 4 new disks, and bled the lines! Silly me, I would have to rebleed them a few times again after switched out my slave cylinder! It ruined my perfect paint on my calipers :( I don't have pictures. I will be repainting them again this summer though!

I am missing alot of pictures, so I will be brief with details on the rest!

Got my first ZE back in July of this year. I was very excited. I paid $800 for what looked like a very clean engine. Put the engine in the car, hooked up all my wires (which were a HUGE mess because I didn't label anything) and got the car to start up on the FIRST TRY! Take that parents! I was doing this all at my parents house because I was home for the summer during my internship. They nay-sayed along every step of the process and never thought I'd get it done!

Here is a video of the first time starting it! The ZE w/ no exhaust sounds like a grizzly in person...the video doesn't do it justice! Sorry for the poor quality, it was dark and I had JUST finished plugging stuff in, and I was jumping up and down like a little kid to get it started.
http://picasaweb.google.com/wspsellsint ... 9494106978" onclick="window.open(this.href);return false;

When I started it, my family ran outside, and my neighbors did too because the damn thing was so loud!

(PS - that IS a straight neck manifold! It was a PITA the way I installed it though, so I wouldn't do that way again)


After I got the engine installed, I ordered the cheap ebay headers and bolted them on! I fit them to my stock exhaust by cutting the pipe between my resonator and cat. converter and put some BIG clamps on the joint...it was pretty ugly and ghetto and leaked alot, but it held well enough for then.

Went to napa and got brand new axles (lifetime warranty anyone?) and some other nuts and bolts. Hooked everything up, poured some gear oil in, changed the oil on the engine w/ some nice amsoil full synthetic, and I thought I was good to go!

The car was not inspected at this point, and it was not registered so I did not have license plates. I still hadn't worked out the cars idle issues, as it could not stay started for more than 10 seconds without blipping the gas. At this point, I let the engine be for awhile, because I had other things to get to before I could attempt to drive the thing!
User avatar
onlytrueromeo
Senior Member
Posts: 2756
Joined: May 16th, 2007, 10:05 pm
Location: Albany, NY

Re: onlytrueromeo's '92 GSZE

Post by onlytrueromeo »

My next step was suspension!

So I ordered some of these: Image

Some of these: Image

Some of these:Image


Oh yeah, and some of these:Image

I wanted a completely new suspension, and something that would be great for handling!

Installing the things was a bit tricky, as I didn't completely order the right parts :x since I was impatient. I went w/ the ZX2 struts and Ground Controls, but I went with the MX3 strut mounts and bearings...which means I had to drill them out to fit! :cry: I could have spent the same amount of money and gotten the ZX2 mounts which come w/ the bearings!

Here are pictures of what I had to do to get everything to fit right!

Step 1 - Buy Parts!

Step 2 - You need to hammer off the caps on the struts to fit the coilover body on. I tried alot of different things, but a chisel and a hammer seemed to work out the best.
Image
Cutting away at the cap a little helps get the ones that don't want to come off easily!
Image

Step 3 - Wrap the base of the strut with duct tape like so. I wrapped it until the base of the coilover sits nice and snug. It was hard to get it over it when I was done, but it went! I did NOT use the O-rings. They are stupid and don't work.
Image

Voila!
Image


More pictures!
Image


I ended up going with 300lb Front and 200lb rear (as long as they gave me what I asked for), which push the ZX2's a little, but are still OK. The springs are like 1/2 the size of stock. It's crazy!
User avatar
onlytrueromeo
Senior Member
Posts: 2756
Joined: May 16th, 2007, 10:05 pm
Location: Albany, NY

Re: onlytrueromeo's '92 GSZE

Post by onlytrueromeo »

Well I was kind of making this like a story, but seeing that I don't update it very often, I should just post pictures and stuff!

I've bought this stuff for the car:
$800 Custom seats and door panels
$30 Custom Headliner
$20 Moonroof control
$20 Moonroof motor
$20 Interior dome white LEDs
$100 Mazdaspeed Shift Knob
$50 Mazdaspeed pedals
$30 Leather shift and ebrake boot
$30 SRD Ebrake handle
$30 Miata handles
$150 94+ Dash
$150 New carpet
$30 Floor mats
$150 Soundproofing
$25 Chrome Speedo Rings
$15 Reverse glow gauges
$650 Exhaust + headers
$800 KLZE
$200 Clutchmasters Clutch
$100 Amsoil Fluids
$70 Front wheel bearings put in
$40 Tie Rods
$40 Ball Joints
$300 Poly Bushings (waiting)
$120 Strut Mounts
$220 ZX2's
$400 Ground Controls
$80 Solid Endlinks
$150 Whiteline swaybar
$50 probinator eeprom
$40 Chippable ECU
$80 8.5mm Spark plug Wire kit
$10 Spark Plugs
$150 Curve neck manifold + TB
$100 Outlaw thermal spacers
$70 Stuff for HEI Mod
$150 SS Door Sills
$175 Mazdaspeed Front bumper
$100 JDM Foglights
$100 Corksport Strut bars
$100 SS Corksport Brake lines
$20 Brake caliper rebuild kit
$150 Brembo Rotors
$80 Ceramic pads
$50 Bronzeoil shifter bushings + nylon stabilizer bushing
$150 CD Deck w/ USB Support
$180 Polk Momo mmc6500 front speakers
$150 JL 12w3v3
$100 JL 300v2
$80 JL 250 monoblock
$30 1F cap
$50 misc. wires and distribution block
$30 Box materials (3/4 MDF, screws + caulk)
$100 POR 15 paint for engine bay + cheap spray gun
$200 Projector headlights
$200 Cheap ebay rims
$650 All weather tires (80,000 mile warranty - got them for slow RS originally)
$250 Water pump, timing belt, pulleys and tensioner
$20 Front washer pump
$20 Rear Washer pump
$150 Rust spot fix (rear washer pump area)
$20 Air horn (one of my most anticipated installs, been waiting for a year hopefully it will go in soon so I can terrorize LOL)
$40 Front lip
$500 in labor paid to shops for maintenance/alignments, etc. (stuff I couldn't do, not oil changes)
$80 New battery
$30 digital battery terminal
$40 Ground wire kit + 0 gauge wire for alternator
$100 RSX rear valence
$30 Black Altezza tails
$50 Clear side markers (all)
$80 missing interior pieces (trunk stuff)
$170 AWR Engine mounts
$50 Camber bolts (I need 2 sets w/ my B&G setup I have right now...I don't like being so low)
User avatar
onlytrueromeo
Senior Member
Posts: 2756
Joined: May 16th, 2007, 10:05 pm
Location: Albany, NY

Re: onlytrueromeo's '92 GSZE

Post by onlytrueromeo »

Well here are some pictures of my car since I didn't have any of the interior.

I custom wrapped my interior w/ blue + black leather, including the door panels.


Image

Image

Image


I also installed a leather ebrake boot, mazdaspeed pedals and shift knob.


The interior was almost fully laid out with RAAMMAT and other sound deadening material. I still have an entire roll to use, I will use some on my roof and doors, and might sell the rest! (They're 60ft rolls I believe)

I got new ultraplush carpet from rockauto...let me tell you, this carpet is NICE. Super soft and so far its been easy to clean. The guy I bought the car from spilled so much food the there was deadly amount of mold on the old carpet, so that went right in the garbage.

My doorpanels still need work - I need to mock up something around my Polk Momo Speakers.

The biggest problem with my interior right now is that I don't have a headliner installed. I'm wrapping it w/ suede cloth, but somehow it got bent so I'm trying to fix that.


I also have a full 94+ dash to throw in the car that I will probably start this week! I am VERY excited about this, since I dislike the 92 dash and it's lack of cupholders!
Last edited by onlytrueromeo on May 25th, 2009, 11:43 pm, edited 2 times in total.
User avatar
onlytrueromeo
Senior Member
Posts: 2756
Joined: May 16th, 2007, 10:05 pm
Location: Albany, NY

Re: onlytrueromeo's '92 GSZE

Post by onlytrueromeo »

This weekend I drove 10-12 hours round trip to visit Nd4SpdSE and pick up a bunch of parts!

I got:

JDM Foglights
Mazdaspeed front bumper
Corksport SS Brake lines
MX3 Stainless Door Sills
Corksport strut bars (Front fits over curve neck!)
Custom hatch cover (that I am modifying slightly)


Today I spent the day cleaning the back of the car, starting the modification of the hatch cover (no stores were open so I couldn't finish), cleaning my wheels, and uninstalling my capacitor.

Pictures of some of the stuff!

In progress
Image

New bumper!
Image

Front strut bar on!
Image

Wheel before
Image

Wheel After
Image

New setup
Image

Hatch cover! (Incomplete)
Image
User avatar
Nd4SpdSe
Senior Member
Posts: 11212
Joined: May 25th, 2002, 2:01 am
Location: Québec City, Quebec, Canada
Contact:

Re: onlytrueromeo's '92 GSZE

Post by Nd4SpdSe »

Hey man how's the strut bar working for ya?
1992 Mazda Mx-3 GSR - 2.5L KLZE : Award Winning Show Car & Race Car ['02-'09] (Retired)
2004 Mazda RX-8 GT - Renesis Wankel : LS3 Coils, BHR Mid-Pipe + Falken RT-615K 245/40r18
2011 Mazda Mazda2 GS - 1.5L Manual : Yozora Edition (1 of 500)
2003 Nissan Xterra SE - 4x4 Supercharged : 2" Body Lift, 4" Suspension Lift & 33" MTR Kevlar
2001 Nissan Frontier SE - The Frontrailer : Expedition/Off-Road Trailer Project
User avatar
solo_ryder
Senior Member
Posts: 6289
Joined: October 16th, 2004, 2:01 am
Location: British Columbia

Re: onlytrueromeo's '92 GSZE

Post by solo_ryder »

Very impressive progress so far sir. I like the seats and all that, came out nice.

I despise the rims though.. but I know its expensive to own and maintain a nice set of rims.. Hence me also running 15" stockers this year..
User avatar
onlytrueromeo
Senior Member
Posts: 2756
Joined: May 16th, 2007, 10:05 pm
Location: Albany, NY

Re: onlytrueromeo's '92 GSZE

Post by onlytrueromeo »

Front one has definitely improved the steering response, still have yet to install the back one! For the hatch cover you gave me, I installed the OEM hinges and strings so it performs just like a stock one. I am also redoing the plexi so that it doesn't have the matching paint from your car. I am thinking of covering the bottom of the cover in felt also so that it looks just as good as the top. BTW, you can totally read MAZDA in the reflection on the hatch when you're driving with an overhead sun!


Today I spent an hour or 2 hooking up the halos, running new washer sprayer line (WOW that made a big difference) and cleaning up my engine bay. I'm going to be running new grounds and power wires for the starter and alternator soon!

I only have a few pictures, but I wish I had some of the washer spraying in action - it hit the rear hatch at first! I had to adjust the nozzles. I also cleaned the nozzles so they spray more evenly!

Image

Attempting to clean up some of the wiring
Image

All the stuff I pulled off (lots more to go)
Image

New Clear Washer lines
Image


My Dog digging a hole while I do this :?
Image


My fuel :lol:
Image
User avatar
onlytrueromeo
Senior Member
Posts: 2756
Joined: May 16th, 2007, 10:05 pm
Location: Albany, NY

Re: onlytrueromeo's '92 GSZE

Post by onlytrueromeo »

solo_ryder wrote:Very impressive progress so far sir. I like the seats and all that, came out nice.

I despise the rims though.. but I know its expensive to own and maintain a nice set of rims.. Hence me also running 15" stockers this year..

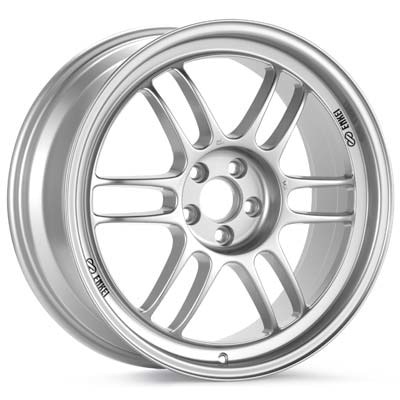
Well, those rims aren't staying forever. They will eventually become my winter beater rims, so I can rock either of these when I can get together $1200 for rims and tires :shock:

RPF1's
Image

Or


949 6UL's
Image


The 949's are not only cheaper, but come w/ dual valve stems, and are available in 15x8. I love the RPF1's look though, but finding one in 16x8 is proving to be difficult + expensive!
User avatar
solo_ryder
Senior Member
Posts: 6289
Joined: October 16th, 2004, 2:01 am
Location: British Columbia

Re: onlytrueromeo's '92 GSZE

Post by solo_ryder »

RPF1 ftw.

Stay with 16" though man on either rims. I like how you think sir
User avatar
onlytrueromeo
Senior Member
Posts: 2756
Joined: May 16th, 2007, 10:05 pm
Location: Albany, NY

Re: onlytrueromeo's '92 GSZE

Post by onlytrueromeo »

Haha, thanks. Unfortunately the 949's are only being produced in 15" now I believe, BUT they're being made stronger than the RPF1's, which is kinda cool.

Ideally, I want a +36-38 16x8 RPF1 w/ 205 to 215 Toyo T1R's. (Light summer tires) Or I might go w/ General Exclaim UHP's because they're throw away cheap! That setup is ~$1500 though!
Post Reply

Return to “MX-3 Worklogs”