Can I individually turn the crank and front/rear bank to get my timing belt correctly on ?
Don't know if it's necessary but I'm trying to reset my timing belt to rule out that my higher rpm misfire is due to bad set belt.
Installing timing belt
-
WhiteFinish

- Regular Member
- Posts: 1635
- Joined: April 3rd, 2006, 9:48 am
- Location: Netherlands
- Contact:
Re: Installing timing belt
Ryan did a real good write up on making sure your TB in installed correctly. No time to fine it for you. Just Search timing belt and Ryan.
2004 Subaru WRX Silver, stage 2, minty interior.
2002 Subaru WRX Blue, SOLD (best E test numbers I've ever seen)
94 MX-6. Sold
92 GS KLZE 5 Speed
96 GS 5 speed, KLZE, Sold
95 GS Minty Shape Sold
92 GS Sold
92 GS Parts Car scrapped.
Feedback viewtopic.php?f=37&t=66348" onclick="window.open(this.href);return false;
7477th member.
I know you believe that you understand what you think I said but I'm sure you realize that what you heard is not what I meant.
-
RobMinhas
- Regular Member
- Posts: 1614
- Joined: November 5th, 2011, 8:32 pm
- antispam: ~SPAM*SUX~
- Location: Calgary, Alberta
Re: Installing timing belt
I believe this on eis the one Dan is referencing viewtopic.php?f=15&t=77978&start=15
Looks like White found it already so I'm not sure if that's the info he's looking for.
Looks like White found it already so I'm not sure if that's the info he's looking for.
Daninski wrote:This is my MX3. There are many like it, but this one is mine. My MX3 is my best friend. It is my life. I must master it as I master my life. My MX3, without me, is useless. Without my MX3, I am useless. I must fire up my MX3 true. I must drive straighter than any Honda driver who is trying to own me. I must own him before he owns me.
-
Mooneggs

- Forum Moderator
- Posts: 6128
- Joined: August 10th, 2005, 10:08 pm
- antispam: ~SPAM*SUX~
- Location: Hillsboro, OR
- Contact:
Re: Installing timing belt
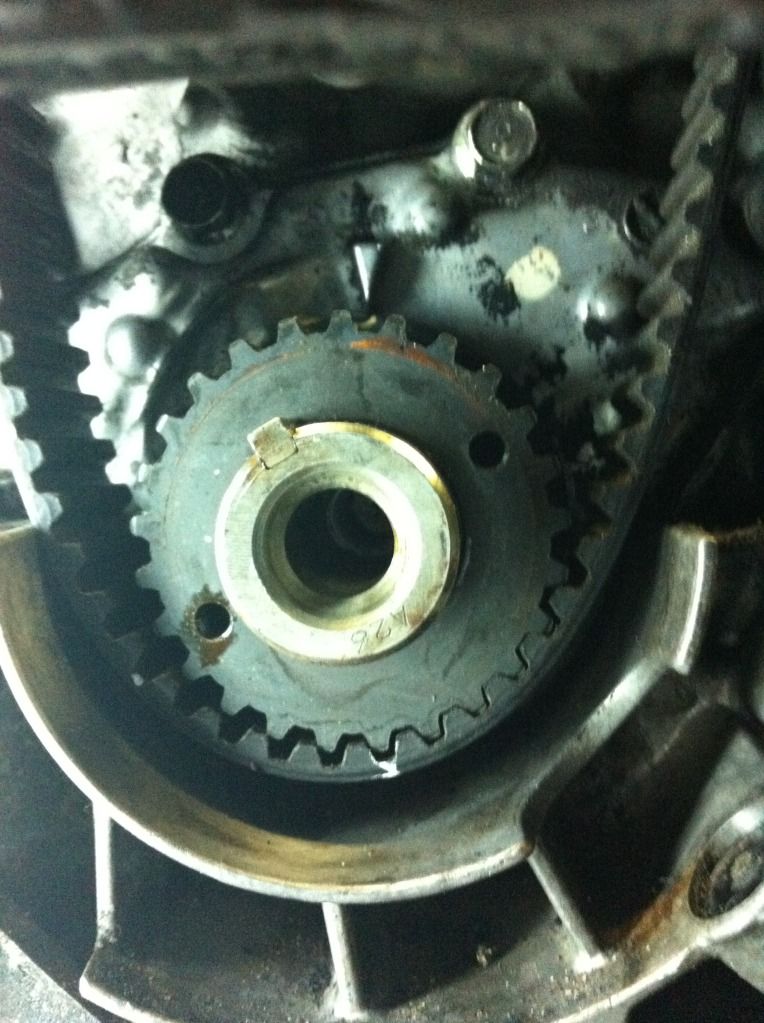
yes, you want to make sure all the timing marks are lined up. That's how you determine if the belt is on correctly. Check the online manual here for the procedure: http://www.mx-3.com/manuals/showimg.php ... B2-017.gif
My Feedback
92 mx-3 gs klze 'race car' IP 15.05 @ 92.5mph
92 mx-3 gs klze 'daily driver' IP 14.55 @ 95.7mph
http://www.cardomain.com/id/Mooneggs

92 mx-3 gs klze 'race car' IP 15.05 @ 92.5mph
92 mx-3 gs klze 'daily driver' IP 14.55 @ 95.7mph
http://www.cardomain.com/id/Mooneggs
-
marcdh

- Regular Member
- Posts: 1460
- Joined: July 26th, 2006, 3:54 pm
- Location: Belfast -Northern Ireland
- Contact:
Re: Installing timing belt
Non interference so turn them all you want! We are lucky to have a brilliant workshop manual, it explains it very well. The only thing I do differently is use a manual timing belt tensioner.
AZ-3 1498cc Turbo! EVO 8 turbo and manifold, 5 stud swap, SSR Type C, DIYPNP seq Megasquirt
Mx-3 2.5 V6 Turbo 291 BHP 251 lbft @ 8psi - Retired due to rust and back at uni
View Worklog

Mx-3 2.5 V6 Turbo 291 BHP 251 lbft @ 8psi - Retired due to rust and back at uni
View Worklog
-
WhiteFinish
- Regular Member
- Posts: 1635
- Joined: April 3rd, 2006, 9:48 am
- Location: Netherlands
- Contact:
Re: Installing timing belt
Great guys !
This is actually my first own timing belt Read a lot of times about it though haha
I'll get going with it tomorrow
This is actually my first own timing belt
I'll get going with it tomorrow
-
WhiteFinish
- Regular Member
- Posts: 1635
- Joined: April 3rd, 2006, 9:48 am
- Location: Netherlands
- Contact:
Re: Installing timing belt
I tried to install the belt today and it f*... drives my crazy.
It kept misalligning and having a hard time to put the belt on.
I started at the crank and put the belt on around the cam gears. The only bearing I took off is the one at the front head. I put this bearing back and squazed the belt around it.
This doesn't seem good.... (don't know what it is)
http://youtu.be/frs_xmE_XqM
A question regarding the manuel.
It says " rotate the crank 720 degrees after allignment, than recheck the mark"
How do you rotate the crank ? It's very hard to move it
Re: Installing timing belt
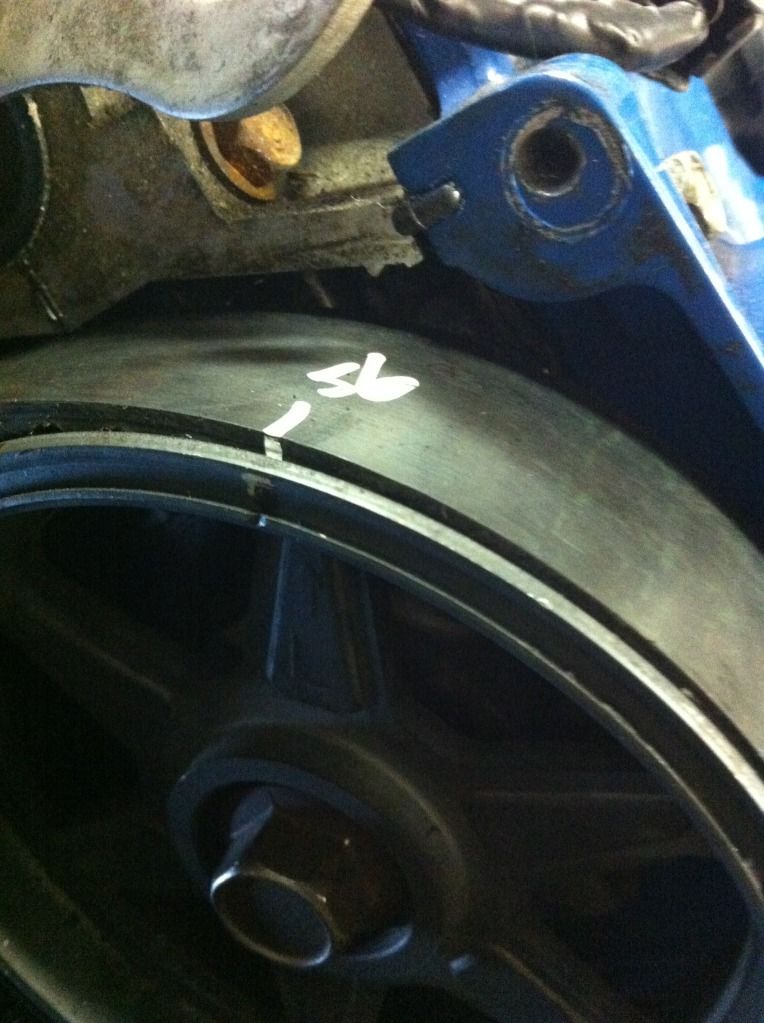
Temporarily put the crank pulley bolt back in and put a large ratchet on the crank pulley bolt and turn exactly 2x clockwise. Removing the spark plugs will make it much easier to turn, but I usually just slowly muscle the crank gear around with the sparks in. Use the mark on the crank gear and the engine block to measure the 2x around. If the belt is on correctly the timing marks will line up again. Note: Every 2 revolutions of the crank the marks on the cam gears and (obviously) the crank gear must line up with the marks on the cylinder head and engine block. The marks you put on the belt will not line up again.
I've replaced MX3 timing belts 3 times and found the best and easiest way is to leave the top idler pulley off (the one between the cam gears and under the top radiator hose) when installing the belt. I also start from the crank and go up and around the idler pulley and front cam gear first. Then do the same from the crank gear and around the tensioner pulley and back cam gear last. Hopefully you have the tensioner piston compressed and held in place by a small nail, drill bit or something - and only the top bolt of the tensioner attached to the engine block so you can swing it out of the way while installing the belt. Once the timing belt is on then install the top idler pulley by pressing down and holding in place while you start the threads of the bolt. Now you can check the install by rotating crank by hand 2x to check the timing marks and confirm the belt is installed correctly. The final step is to install the 2nd tensioner bolt and release the tensioner piston. Rotating the crank and timing belt by hand will not cause the belt to jump.
I've replaced MX3 timing belts 3 times and found the best and easiest way is to leave the top idler pulley off (the one between the cam gears and under the top radiator hose) when installing the belt. I also start from the crank and go up and around the idler pulley and front cam gear first. Then do the same from the crank gear and around the tensioner pulley and back cam gear last. Hopefully you have the tensioner piston compressed and held in place by a small nail, drill bit or something - and only the top bolt of the tensioner attached to the engine block so you can swing it out of the way while installing the belt. Once the timing belt is on then install the top idler pulley by pressing down and holding in place while you start the threads of the bolt. Now you can check the install by rotating crank by hand 2x to check the timing marks and confirm the belt is installed correctly. The final step is to install the 2nd tensioner bolt and release the tensioner piston. Rotating the crank and timing belt by hand will not cause the belt to jump.

Proud owner of a Faded Red 92 MX-3 GS
Re: Installing timing belt
Just quick note on the youtube - totally normal - you are just turning the cam shaft so that it is compressing and continuing past some of the valve springs making it seem to jump.
Proud owner of a Faded Red 92 MX-3 GS
-
WhiteFinish
- Regular Member
- Posts: 1635
- Joined: April 3rd, 2006, 9:48 am
- Location: Netherlands
- Contact:
Re: Installing timing belt
Oooh... so when I do 2 revolutions it timing marks will line up again, but not the marks I made on the belt.davmac wrote:Temporarily put the crank pulley bolt back in and put a large ratchet on the crank pulley bolt and turn exactly 2x clockwise. Removing the spark plugs will make it much easier to turn, but I usually just slowly muscle the crank gear around with the sparks in. Use the mark on the crank gear and the engine block to measure the 2x around. If the belt is on correctly the timing marks will line up again. Note: Every 2 revolutions of the crank the marks on the cam gears and (obviously) the crank gear must line up with the marks on the cylinder head and engine block. The marks you put on the belt will not line up again.
Why is this ? Should it be 4 revolutions before it lines up or i just won't?
What do you mean by the last sentenc? Final step to install the 2nd tensioner bolt ?davmac wrote: I've replaced MX3 timing belts 3 times and found the best and easiest way is to leave the top idler pulley off (the one between the cam gears and under the top radiator hose) when installing the belt. I also start from the crank and go up and around the idler pulley and front cam gear first. Then do the same from the crank gear and around the tensioner pulley and back cam gear last. Hopefully you have the tensioner piston compressed and held in place by a small nail, drill bit or something - and only the top bolt of the tensioner attached to the engine block so you can swing it out of the way while installing the belt. Once the timing belt is on then install the top idler pulley by pressing down and holding in place while you start the threads of the bolt. Now you can check the install by rotating crank by hand 2x to check the timing marks and confirm the belt is installed correctly. The final step is to install the 2nd tensioner bolt and release the tensioner piston. Rotating the crank and timing belt by hand will not cause the belt to jump.
I thought the only thing to come off is the top idler pulley and timing belt tensioner.
Re: Installing timing belt
All I meant was that you don't have to install the tensioner completely before you manually turn the crank to check the belt.
Usually you pull the tensioner completely off the engine and compress the piston and hold it compressed with a hardened nail or small drill bit. Then re-install the compressed tensioner with only the top bolt so you can swing it out of the way while you install the timing belt. The tensioner pulley is still mounted just nothing pushing it against the timing belt. After you install the belt and check it then swing the tensioner into place, install and tighten both bolts and pull the pin that is holding the tensioner piston.
For practical purposes the marks you made on the belt will never line up again - at least not within a 2 - 4 turns of the crank pulley. I assume you made some marks on the belt according to the counts given by Ryan. That is great because if you managed to get the belt on and lined up with the marks on the crank and cam gears then when you check (2x turns of the crank) the cam gears should be lined up with the marks on the cylinder heads. All that matters is that every 2 turns of the crank the cam gears are hitting their marks = the crank and cams are in synch.
Proud owner of a Faded Red 92 MX-3 GS
-
WhiteFinish
- Regular Member
- Posts: 1635
- Joined: April 3rd, 2006, 9:48 am
- Location: Netherlands
- Contact:
Re: Installing timing belt
Okey, i didn't realize it that the marks wouldn't line up.
-
Ryan

- Senior Member
- Posts: 7198
- Joined: April 7th, 2008, 1:06 pm
- antispam: ~SPAM*SUX~
- Location: Manitoba
Re: Installing timing belt
Never heard of that confusion before, I'll go edit the post.
Glad you got it sorted out though
Glad you got it sorted out though
Now with Moderator power!
Black '93 BP RS - wrecked, parted, scrapped.
Green GS - Sold.
Black GS - Summer DD/Race car - Fancy KLZE
Red GS - K8-ATX -> MTX-KLDE - Frakencar. Scrapped
White GS - Rusty. Parts. Scrapped
1997 BMW M3 - my summer baby
2002 BMW 325Xi - sold
2003 Forester Xti - EJ20K swapped.
Feedback
Black '93 BP RS - wrecked, parted, scrapped.
Green GS - Sold.
Black GS - Summer DD/Race car - Fancy KLZE
Red GS - K8-ATX -> MTX-KLDE - Frakencar. Scrapped
White GS - Rusty. Parts. Scrapped
1997 BMW M3 - my summer baby
2002 BMW 325Xi - sold
2003 Forester Xti - EJ20K swapped.
Feedback
-
WhiteFinish
- Regular Member
- Posts: 1635
- Joined: April 3rd, 2006, 9:48 am
- Location: Netherlands
- Contact:
Re: Installing timing belt
Yep.... wasn't fool proof
And i proved it
And i proved it
-
Ryan
- Senior Member
- Posts: 7198
- Joined: April 7th, 2008, 1:06 pm
- antispam: ~SPAM*SUX~
- Location: Manitoba
Re: Installing timing belt
Hey, you got the crank pully being kinda off.
Now with Moderator power!
Black '93 BP RS - wrecked, parted, scrapped.
Green GS - Sold.
Black GS - Summer DD/Race car - Fancy KLZE
Red GS - K8-ATX -> MTX-KLDE - Frakencar. Scrapped
White GS - Rusty. Parts. Scrapped
1997 BMW M3 - my summer baby
2002 BMW 325Xi - sold
2003 Forester Xti - EJ20K swapped.
Feedback
Black '93 BP RS - wrecked, parted, scrapped.
Green GS - Sold.
Black GS - Summer DD/Race car - Fancy KLZE
Red GS - K8-ATX -> MTX-KLDE - Frakencar. Scrapped
White GS - Rusty. Parts. Scrapped
1997 BMW M3 - my summer baby
2002 BMW 325Xi - sold
2003 Forester Xti - EJ20K swapped.
Feedback